
The Desert Perpetual Guide (Under Construction)
Done by: Vedallion#7774 | July 29th 2025
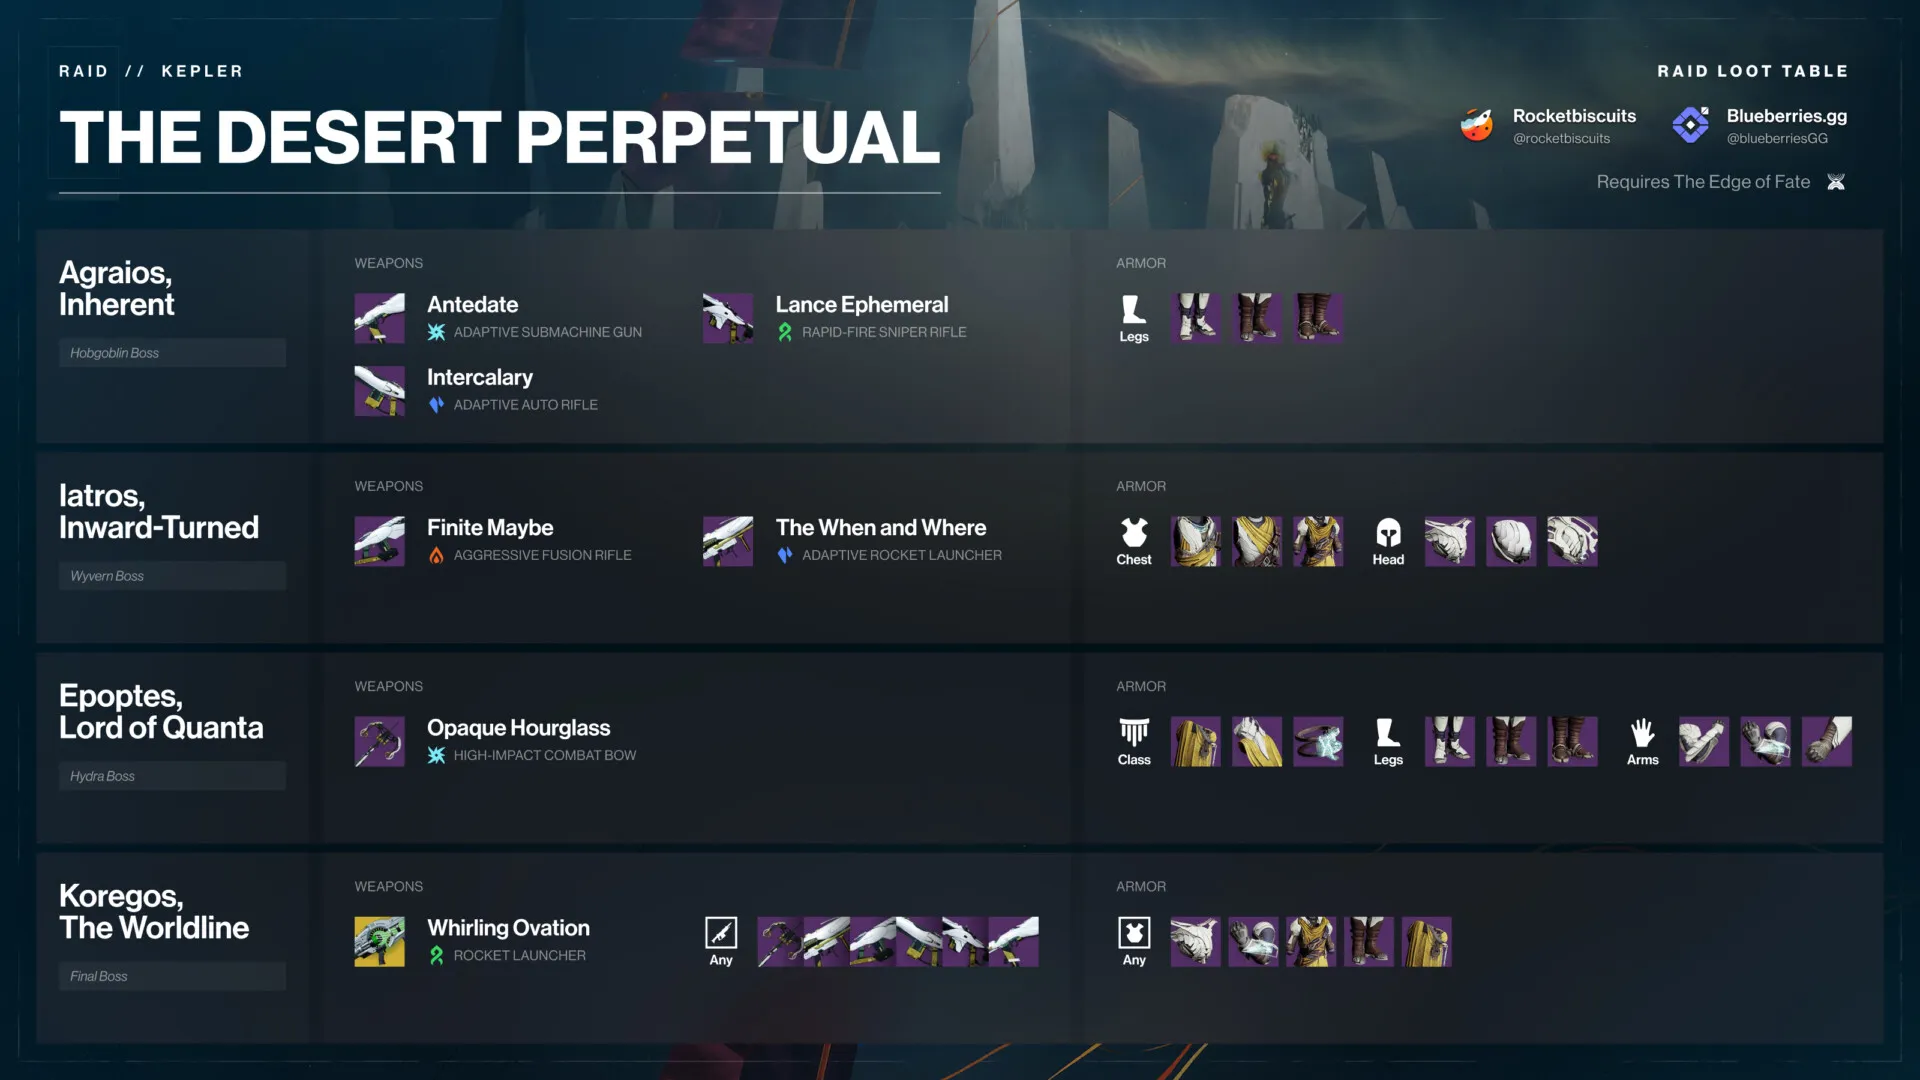
Loot Table
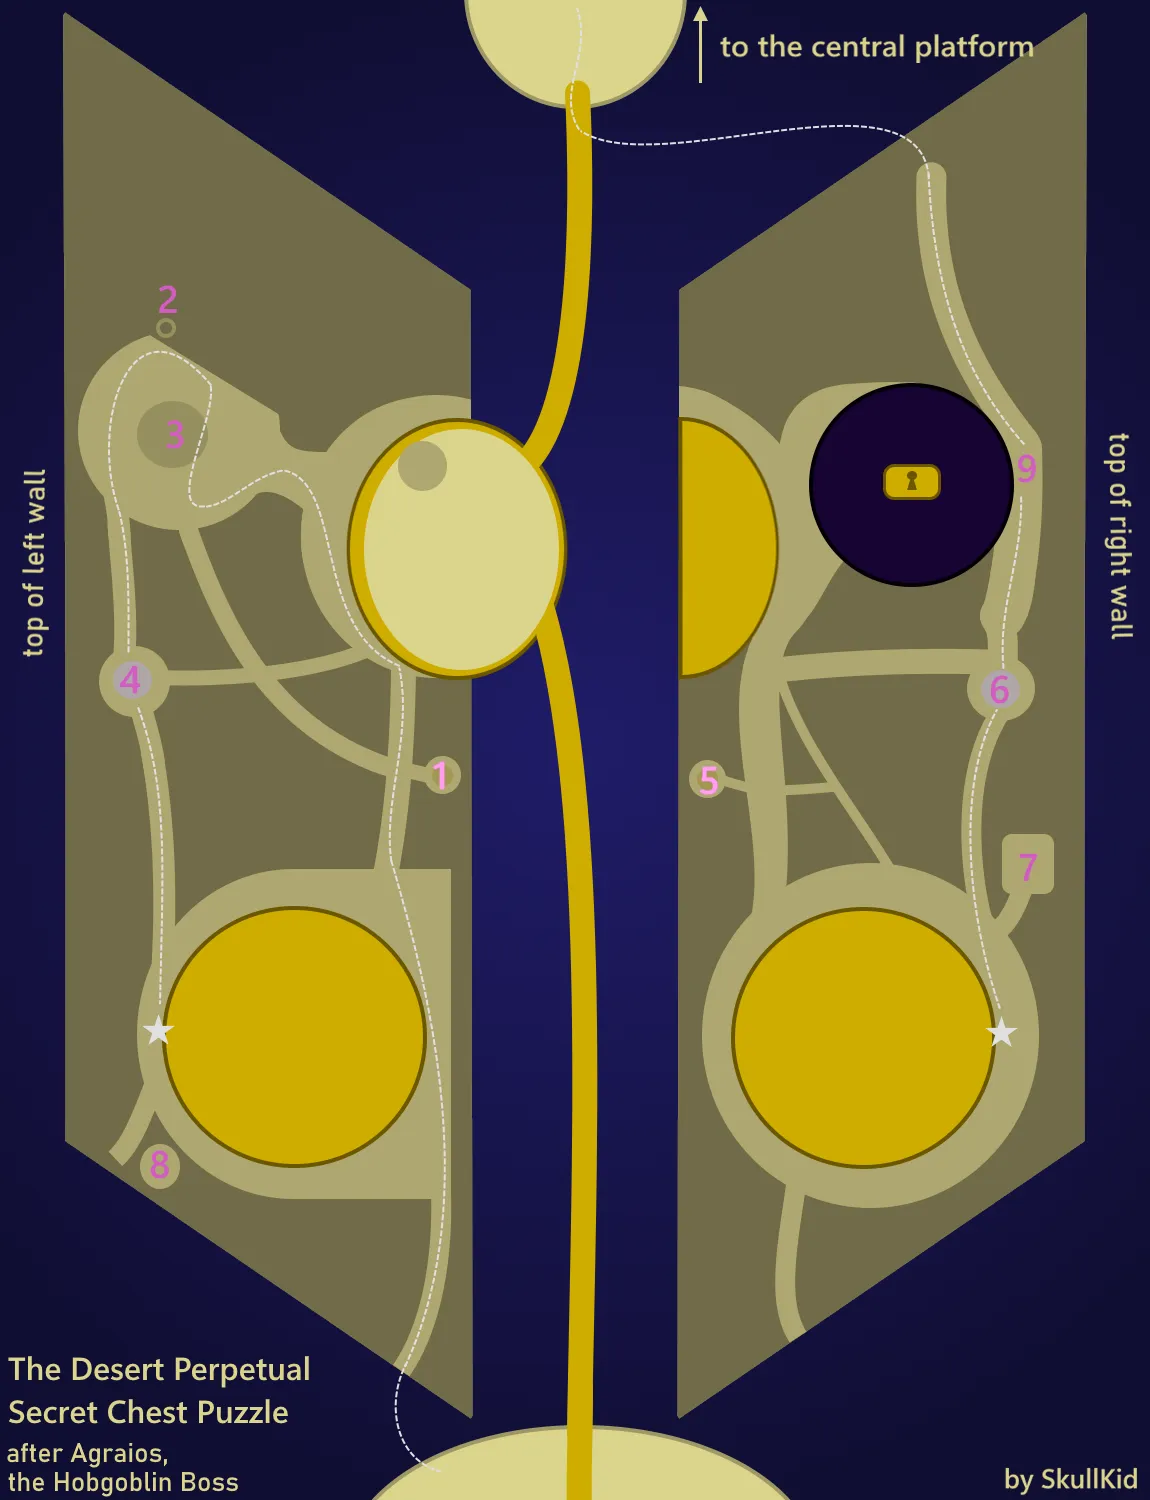
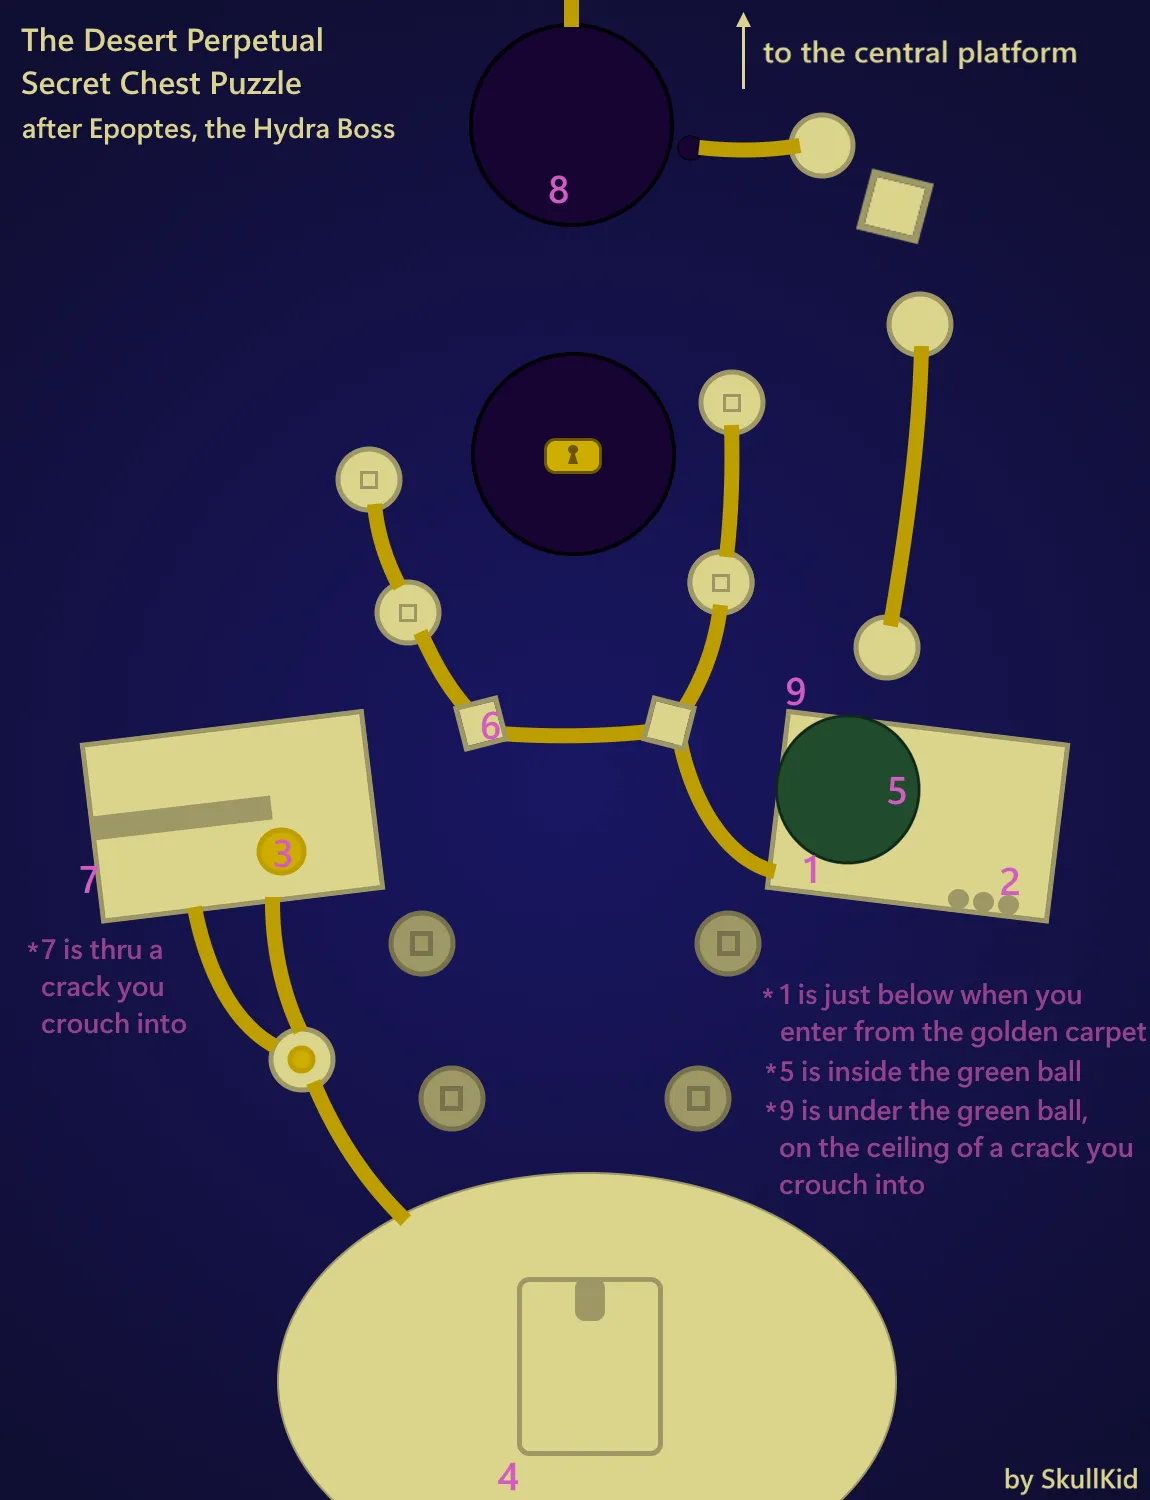
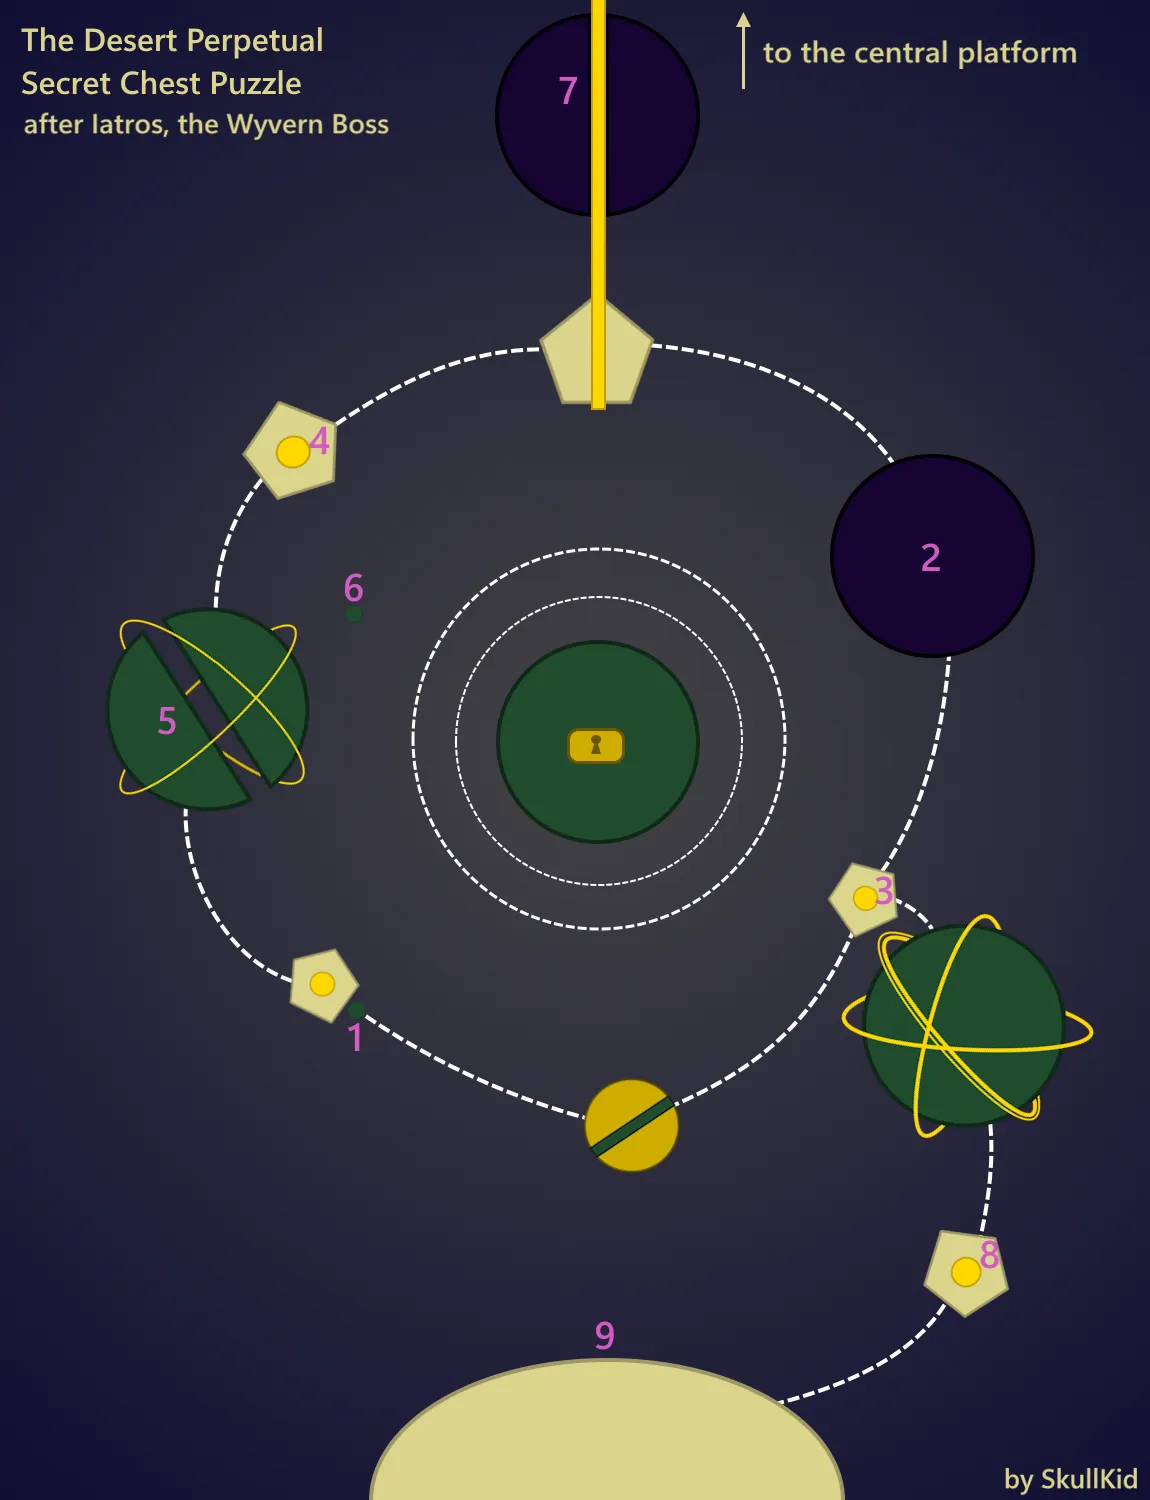
Secret Chests
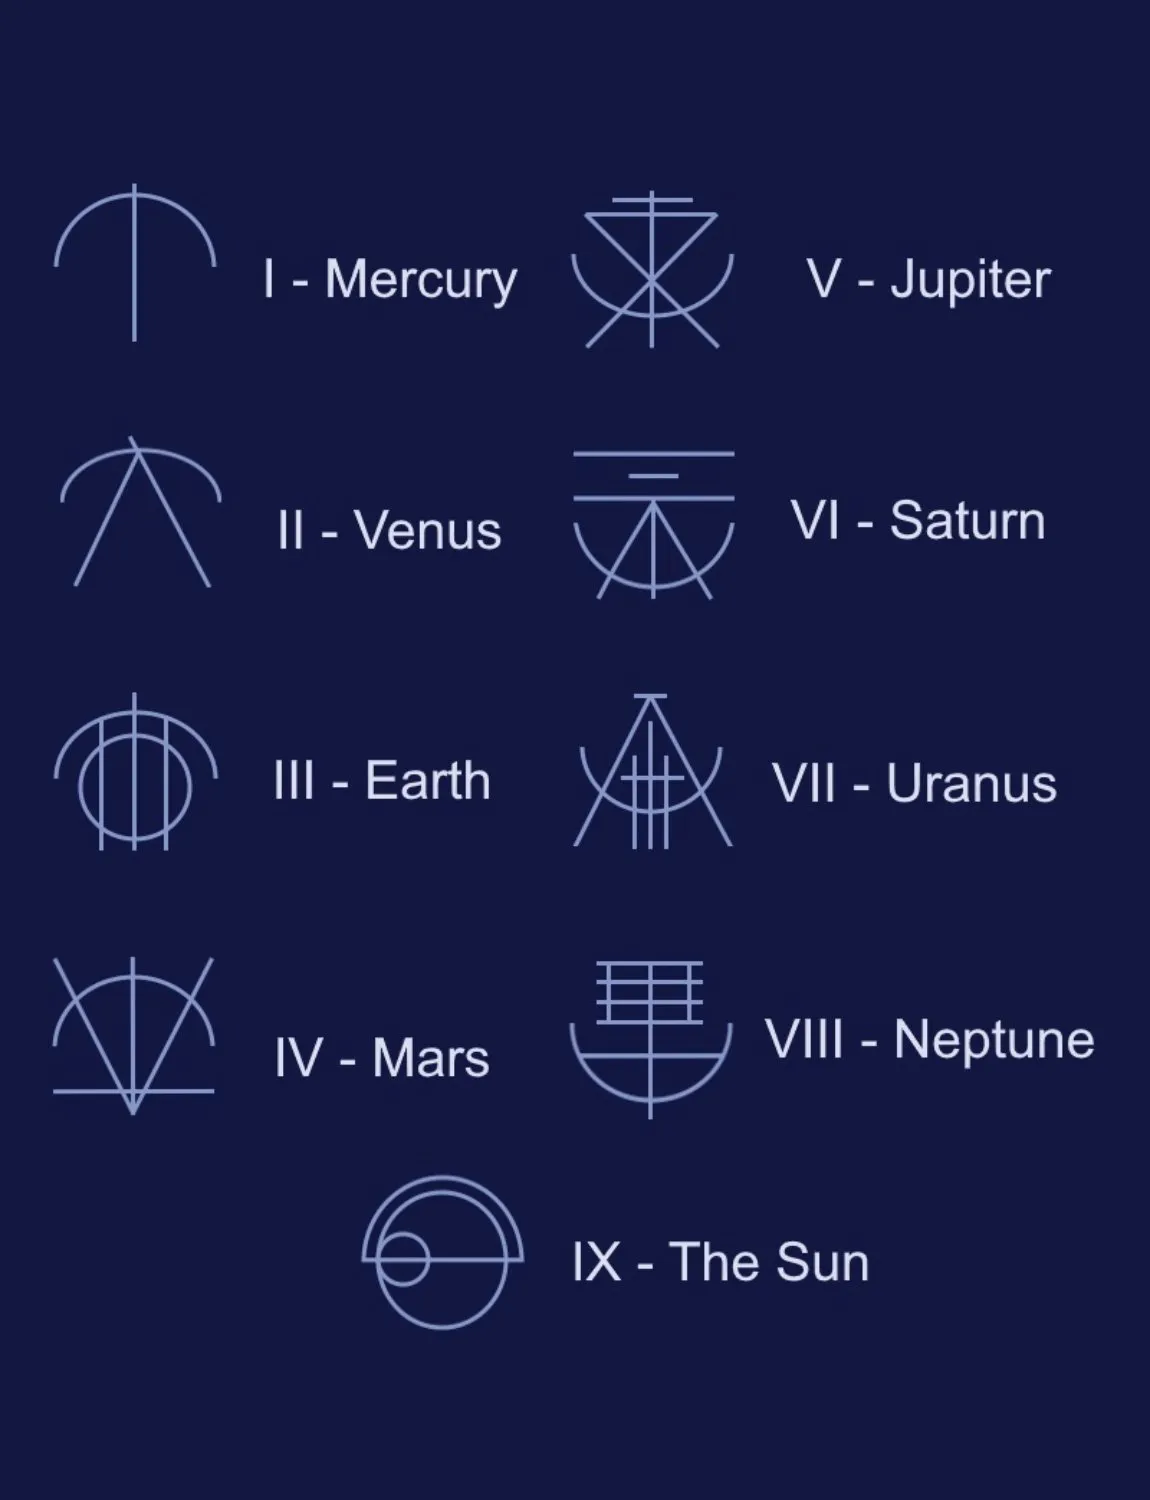
Three secret chests are available for acquisition; each one appears on the way back following the defeat of each of the three bosses. It is mandatory to kill the boss and finish the encounter. Four of the symbols must be activated at random for each secret chest. A symbol can be activated by approaching it. The ones that are not necessary for your current run will shut off when you move away. You can determine which symbols you need to spawn the secret chest by looking at the ones carved into the ball where it will appear.
Below are the symbols of The Nine, and maps for each chest:
Video Guide
Collectibles (Anchor Locations)
Start the quest by visiting Dean Rebecca on Kepler and pick up the “Map and Territory” quest. Next, complete the raid once to unlock the Network Sensor needed to place anchors. You can now locate and plant all 12 anchors:
- Spawn Location — Directly beneath the spawn platform: drop down and look underneath.
- Central Tower — Ascend the purple central tower near the encounter choice point; on the left side is a pillar with a glowing conflux (near the “All are entangled” plate).
- White Plains — In the open white plains, look right beside a large ball on the ground.
- Hobgoblin Boss Tunnel (midway) — Halfway through the tunnel leading to the Hobgoblin boss, look to your right.
- Hobgoblin Boss Door — Immediately right of the pre-fight door; be sure not to open it before grabbing the anchor.
- After Hobgoblin Boss — As you exit the boss room, check the left side just before leaving.
- Hydra Jump Puzzle (first platform) — On the floating half-circle platform early in the Hydra jump puzzle.
- Hydra Jump Puzzle (second platform) — On the next floating half-circle platform, just before reaching the boss door.
- After Hydra Boss — Underneath a golden tent at the back of the Hydra boss room.
- Wyvern Jump Puzzle — In the right path of the jump section, inside the rotating circle's center, look for a spiral design with the anchor.
- Wyvern Boss Door — To the right side of the boss doorway near the final Wyvern encounter.
- After Wyvern Boss — After defeating the Wyvern and opening the chest, go behind it—there lies the final anchor.
Additional Points:
- 9 of the anchors appear before any encounter starts.
- The last 3 spawn only after clearing each encounter in their specific rooms.
- Anchors on the paths to the bosses will despawn once you interact with the boss door, so try to collect all the pre-boss anchors before fighting the boss.
Video Guide
The Nursery
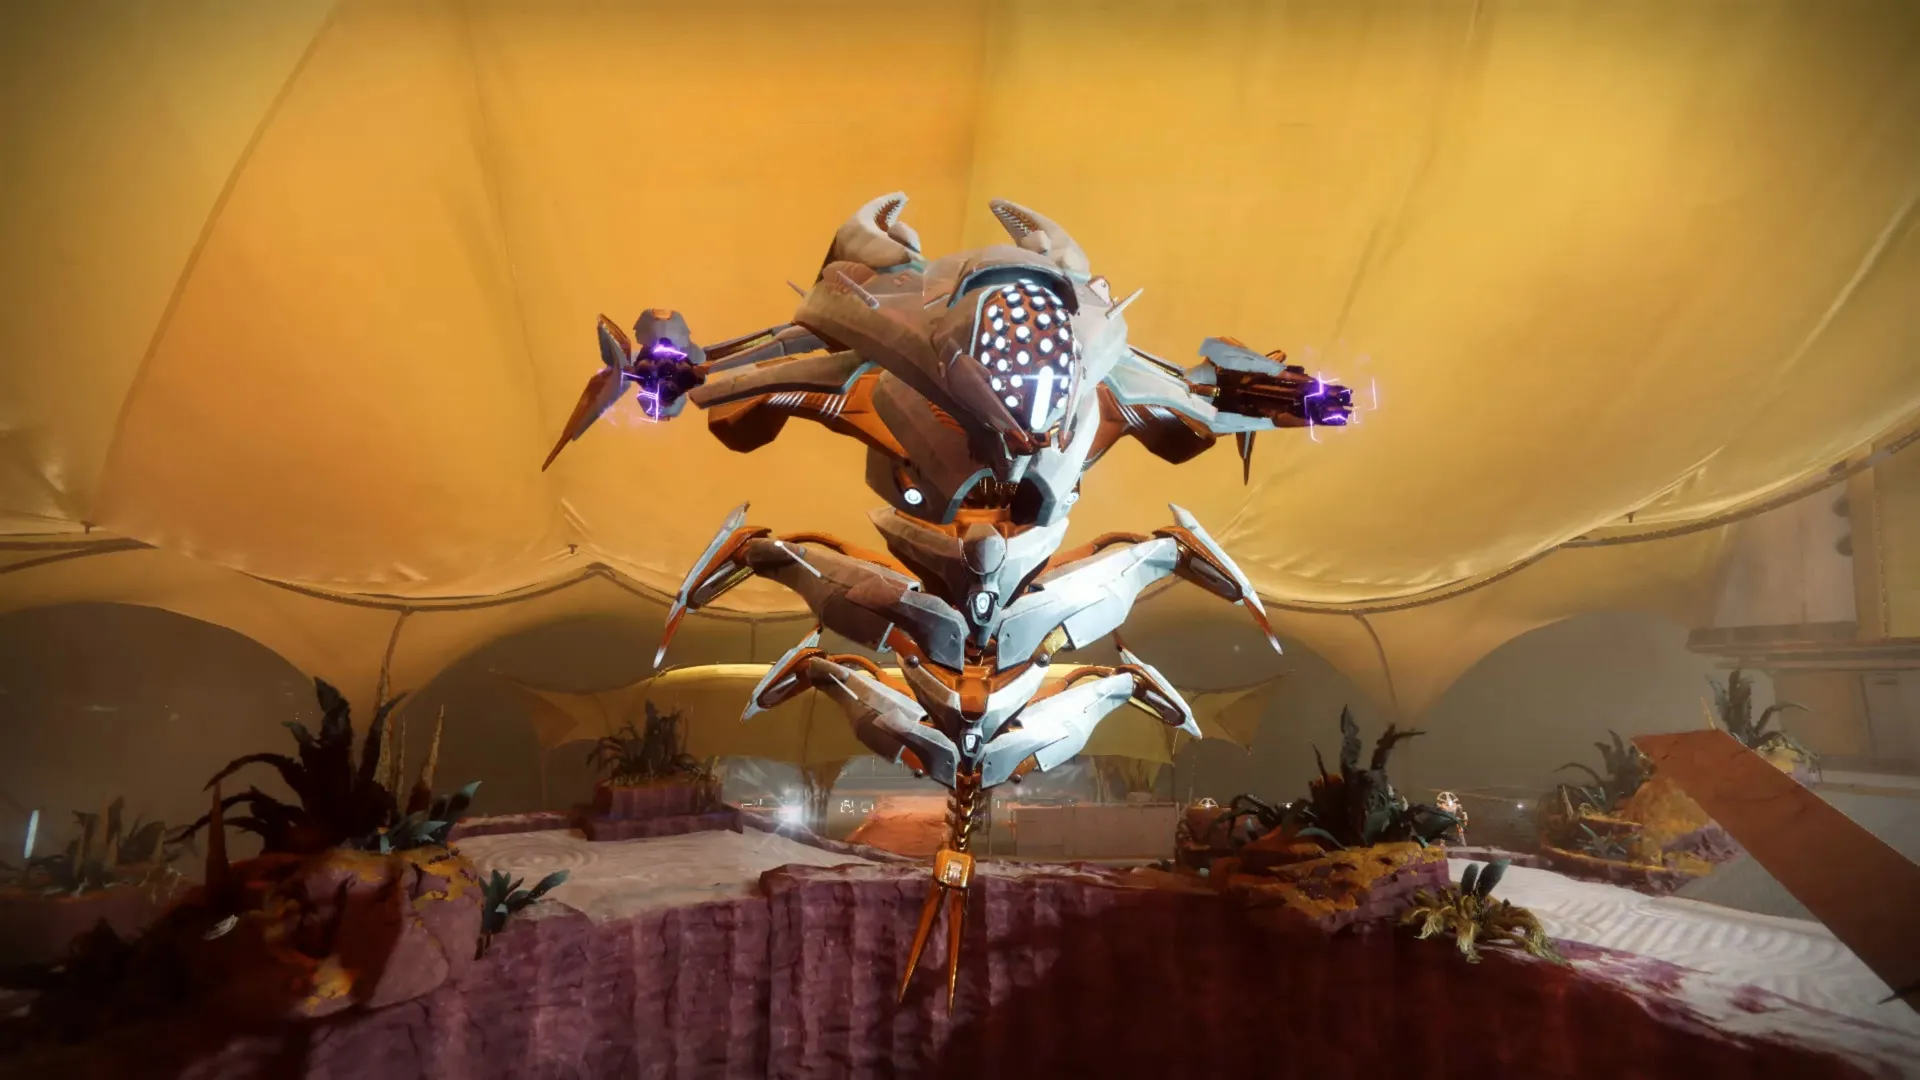
The Nusery is the opening and central area of the raid. A platform with three half-spheres, a complete sphere, and three more half-spheres forming a square along its corners is directly in the middle of the room. The boss you battle may be chosen from the three half-spheres. Each boss will have a mystery flavour text as their interact prompt, and they are as follows:
- "Interference patterns swell" : Agraios, the Hobgoblin
- "All are entangled" : Epoptes, the Hydra
- "Axion is axiom" : Iatros, the Wyvern
When you interact with one of the half-spheres, a line of smaller spheres forms around it. In the distance, a door with one of the Nine symbols on it is in the direction of that line. The big pyramid rising in the distance is the entrance to the encounter. The boss encounters you choose to tackle initially will depend on which of these half-spheres you choose to interact with. You will be returning to this hub region to move elsewhere in between fights.
For the sake of this guide, we will tackle each boss alphabetically.
Agraios, Inherent
Velocity's Tomb- Titans: Thundercrash + Cuirass of the Falling Star (More the merrier!). Bolt Charge.
- Warlock: Well of Radiance / Song of Flame + Sanguine Alchemy / Speaker's Sight for extra healing.
- Hunter: Golden Gun + Celestial Nighthawk.
- Outbreak Perfected / Thunderlord for DPS. Tractor Cannon for debuffing.
- Special / Heavy Grenade Launcher or other burst damage heavies for add clear / Wyverns.
- 3 x Temporality Buff Runners.
- 3 x Chronon Collectors.
Despite being more mechanical in nature, survival is still the top objective with the fight with Agarios. The encounter has a certain flow, and every team member must contribute in some way to its implementation. Considering the quantity of callouts required to even get to the DPS phase, communication is equally important here.
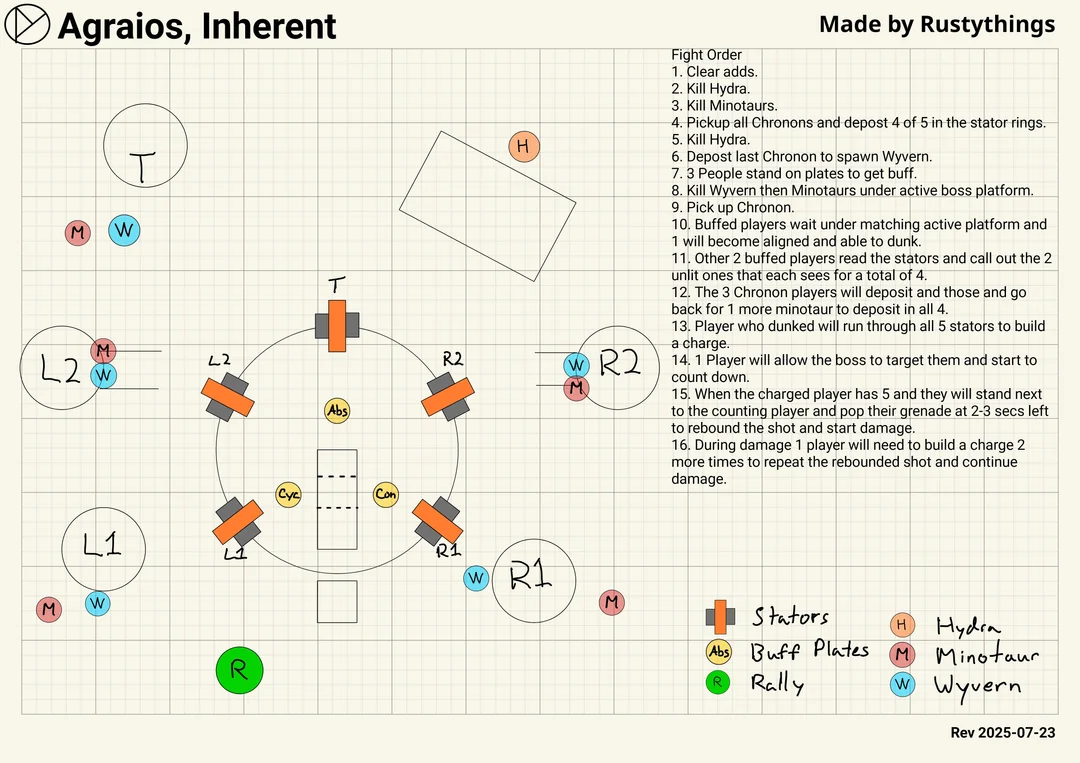
Chronon Phase
Once the encounter begins, kill the initial wave of attackers and a Hydra will appear. Five Minotaurs are spawned after defeating the Hydra, and these Minotaurs drop Chronons. Players must pick up a Chronon and go through each of the five portals in the arena. Wyverns and another Hydra will spawn together. Five new Minotaurs are spawned in after defeating the Hydra. The Wyverns are only a danger that must be eliminated immediately.
At this point, three players can obtain their temporality buffs by standing in the 3 lattice plates in the middle of the arena. Two out of the three bosses will despawn, leaving the boss to be aligned with. However, a tip for this phase is to wait for the boss to become impatient and start the wipe mechanic. This won't despawn the two other bosses, but it will help with the next phase.
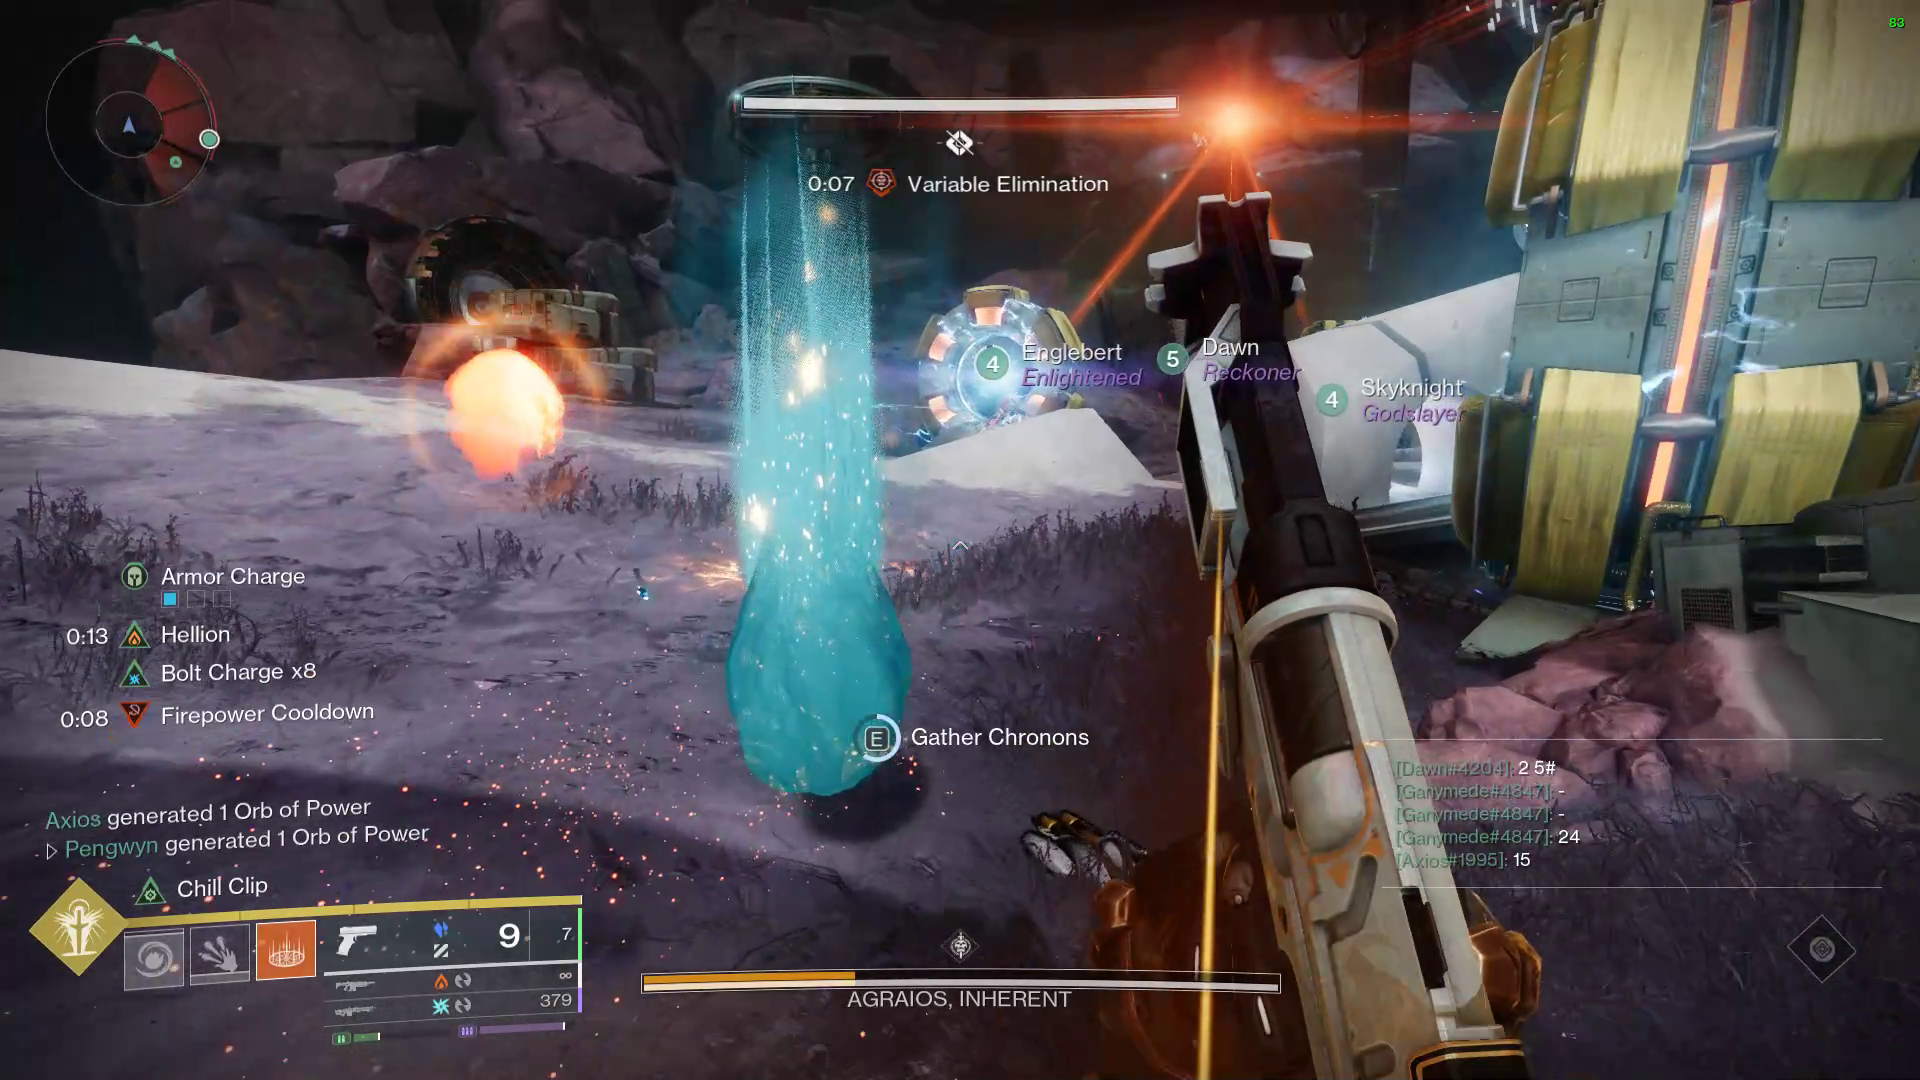
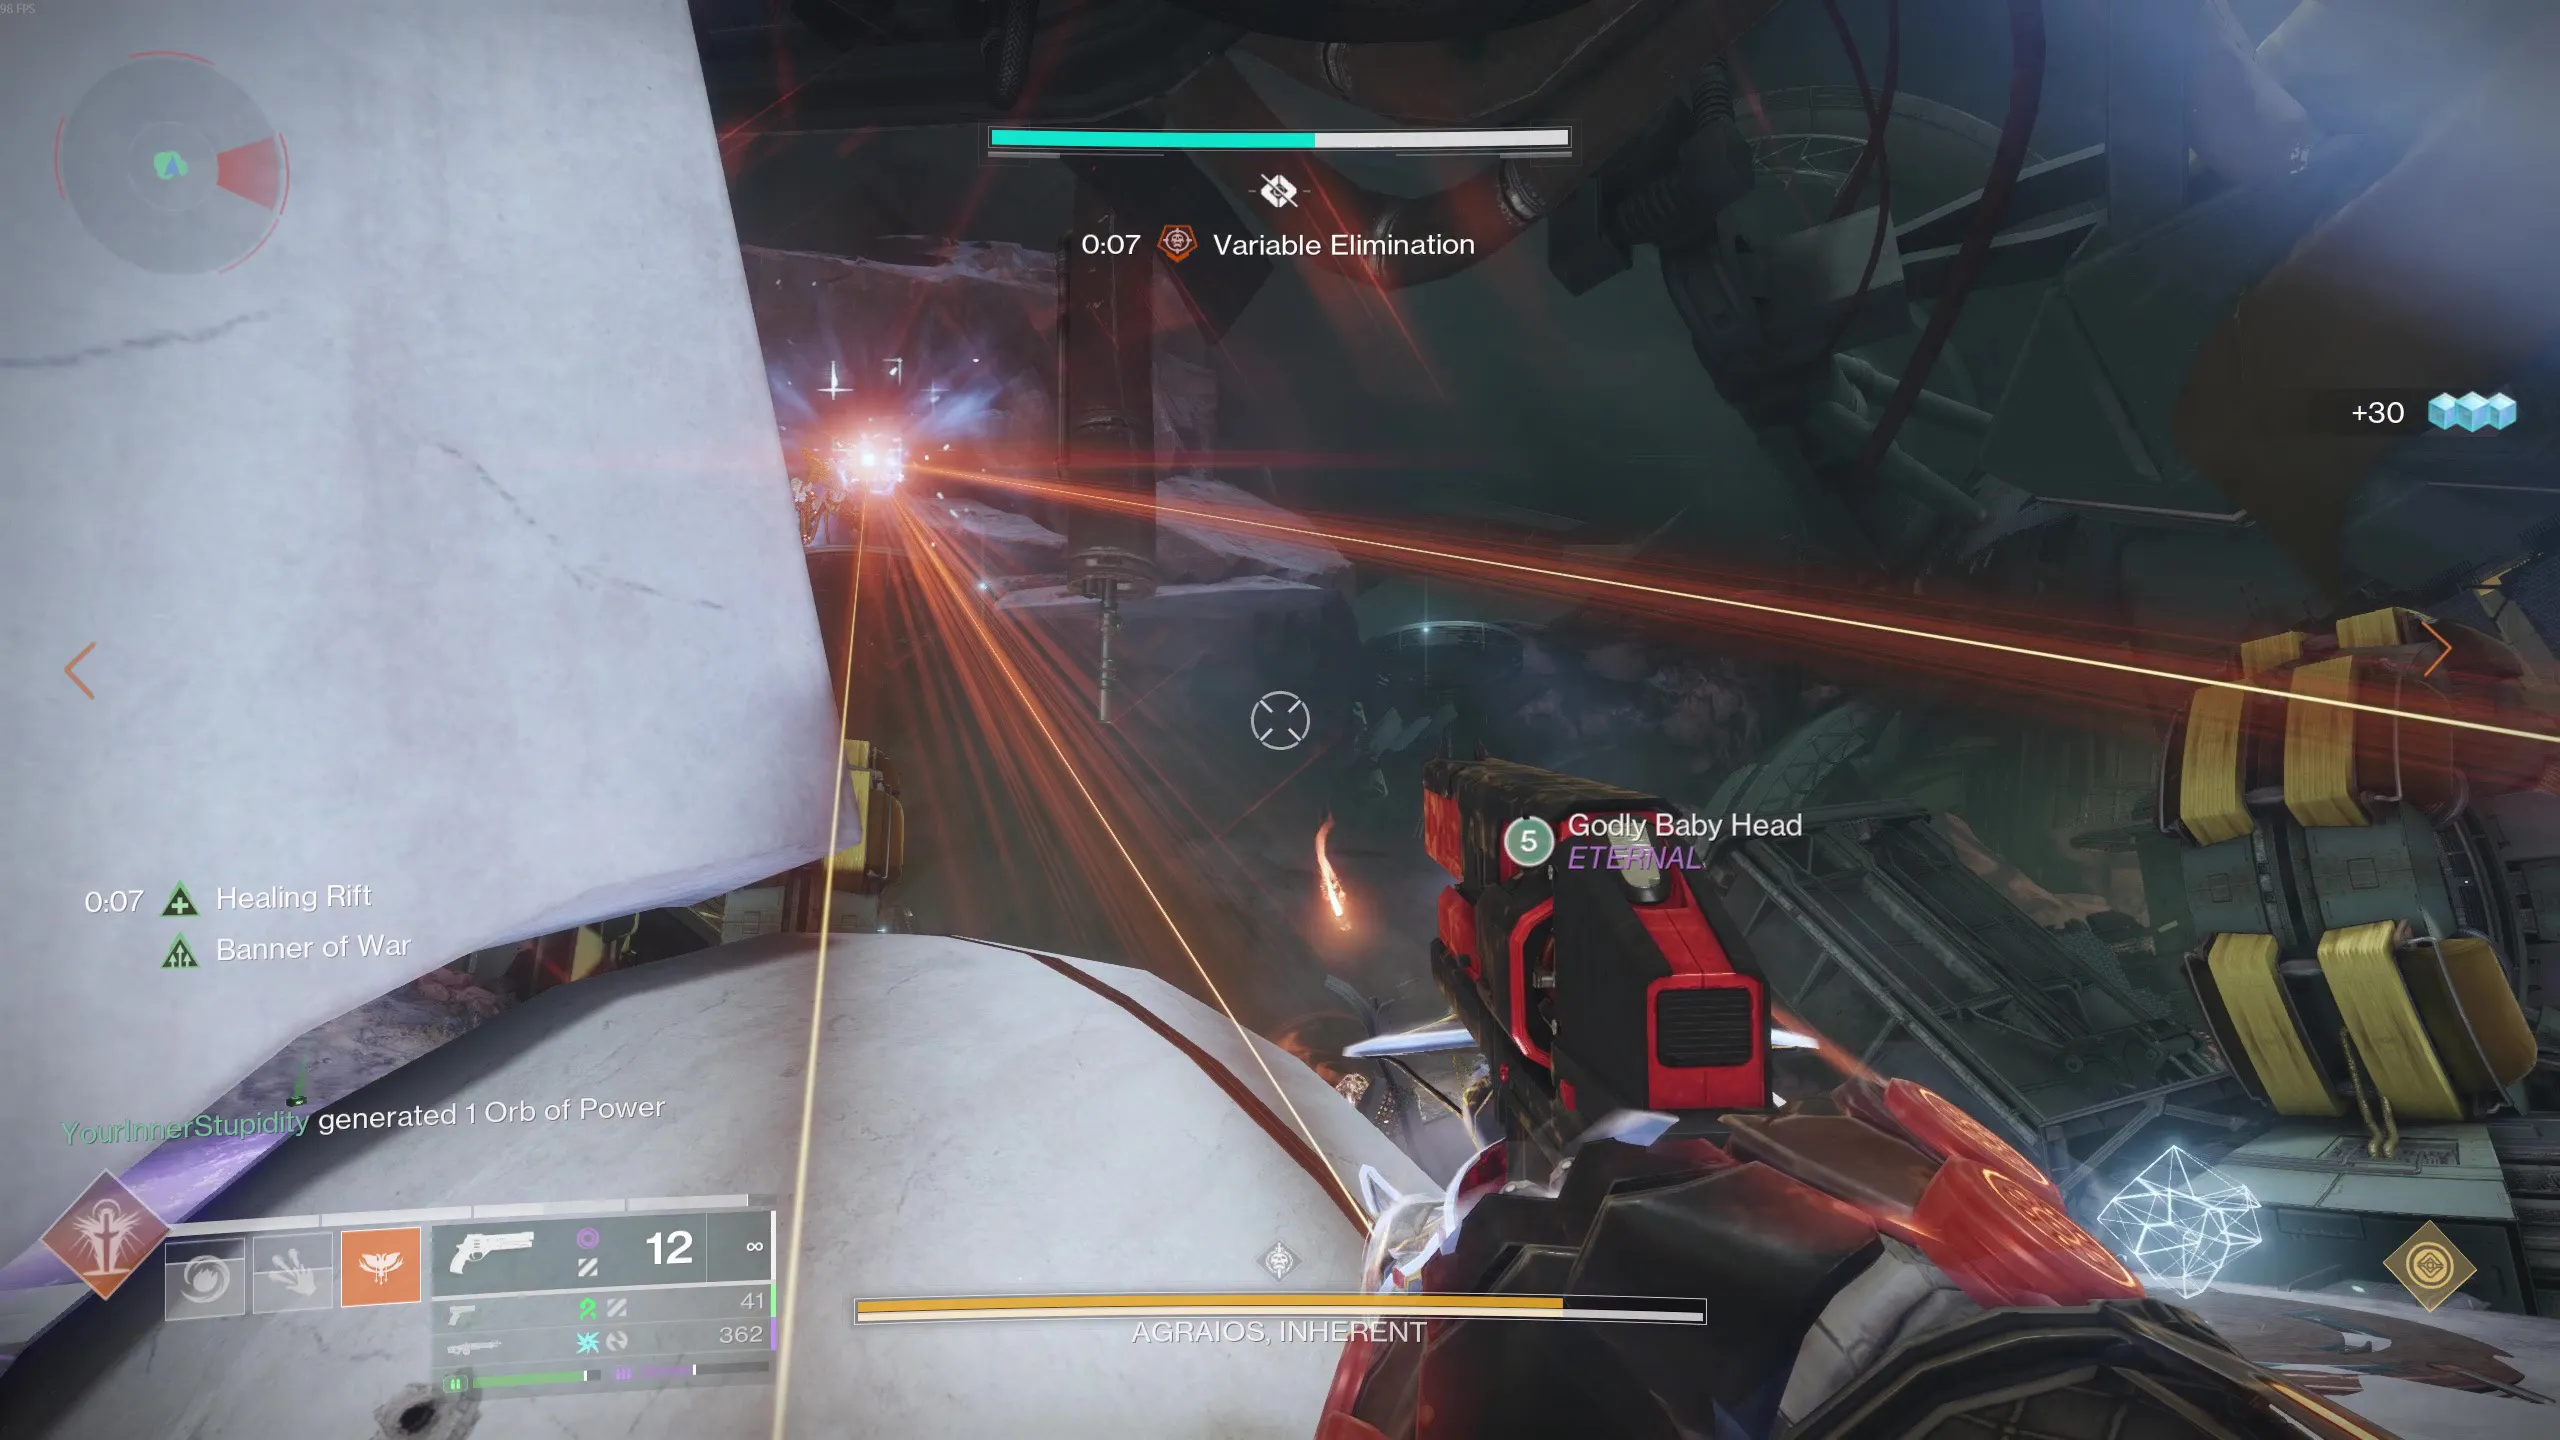
Variable Elimination
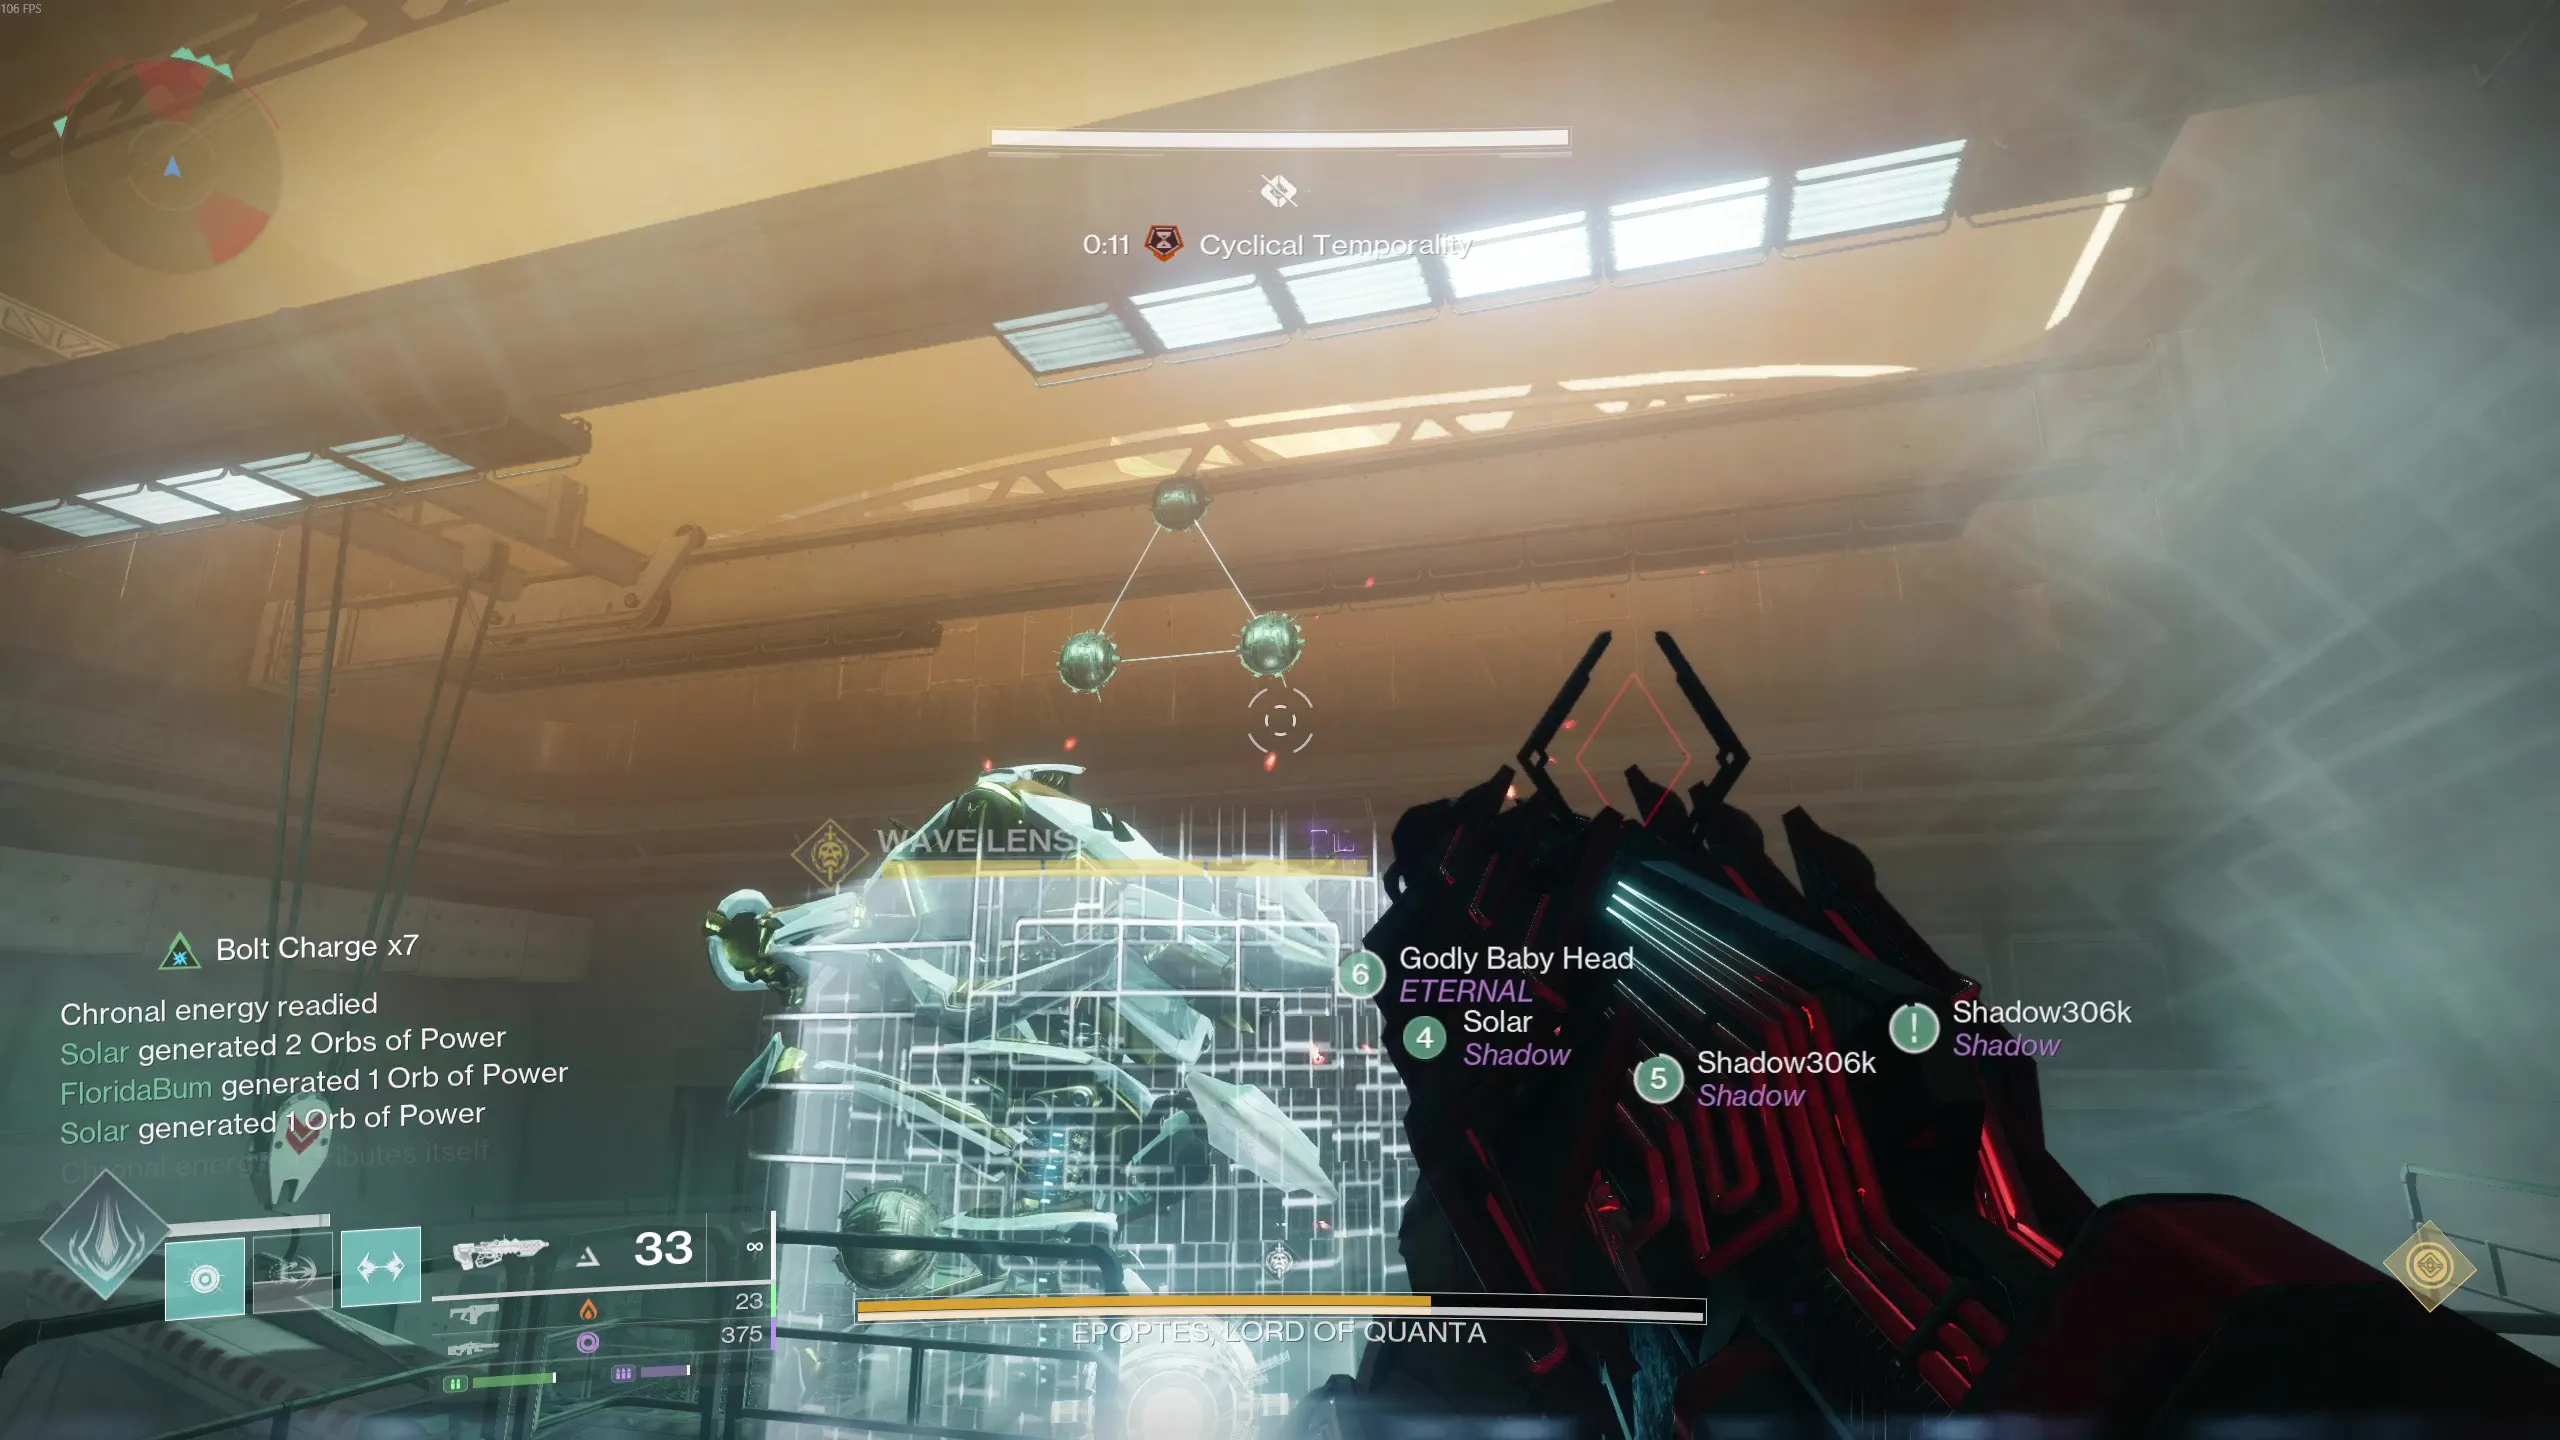
Once the boss activates the next phase, A randomly chosen boss will become "active" and gain the "Variable Elimination" attack. You will be one-shot if you remain in the boss's line of sight for ten seconds. You can reset the timer by losing sight of the active boss, but you are unable to avoid or block this attack. A huge glowing red light on the boss indicates which one is active (See top image).
At the same time, three players can step on the three plates in the middle to get their temporality buffs. There are three forms of it: Absolute, Cyclical, and Constant Temporality. On the upper platforms, the names of the sniping Hobgoblins are then visible to all players. One of the three players with the temporality buff must align with one of the bosses. If you started the account early, two of the bosses will despawn leaving the one boss to align with. If let the boss become impatient and start the wipe mechanic, the two other bosses will not despawn, but the player will simply align with the boss that is doing the variable elimination attack. Look at the name of the boss, it will have one of the three temporality buffs in its name. The player with the matching buff must then go to the terminal below the boss and interact with it. This will "align" the player with the boss, allowing the player to soon start the DPS phase. But before that the aligning player has to make one callout.
At the same time Variable Elimination begins, 4 out of the 5 portals will require a Chronon to be deposited (See bottom image). By right, the other two players with temporality buffs are supposed to callout with two different portals are not glowing (blue in colour). Instead, the easier way is to let the aligning player do the callout, because from the aligning player's perspective, he/she will see one portal glowing red. Which means the remaining four portals are the ones that need a Chronon to be deposited. After calling out the portal, the aligning player can align with the terminal under the boss with the matching name and receive the Tachyon Alignment buff. The remaining players without buffs will collect Chronons from the Minotaurs and deposit them in the four portals that were not called out by the aligning player.
Pre-DPS and DPS Phase
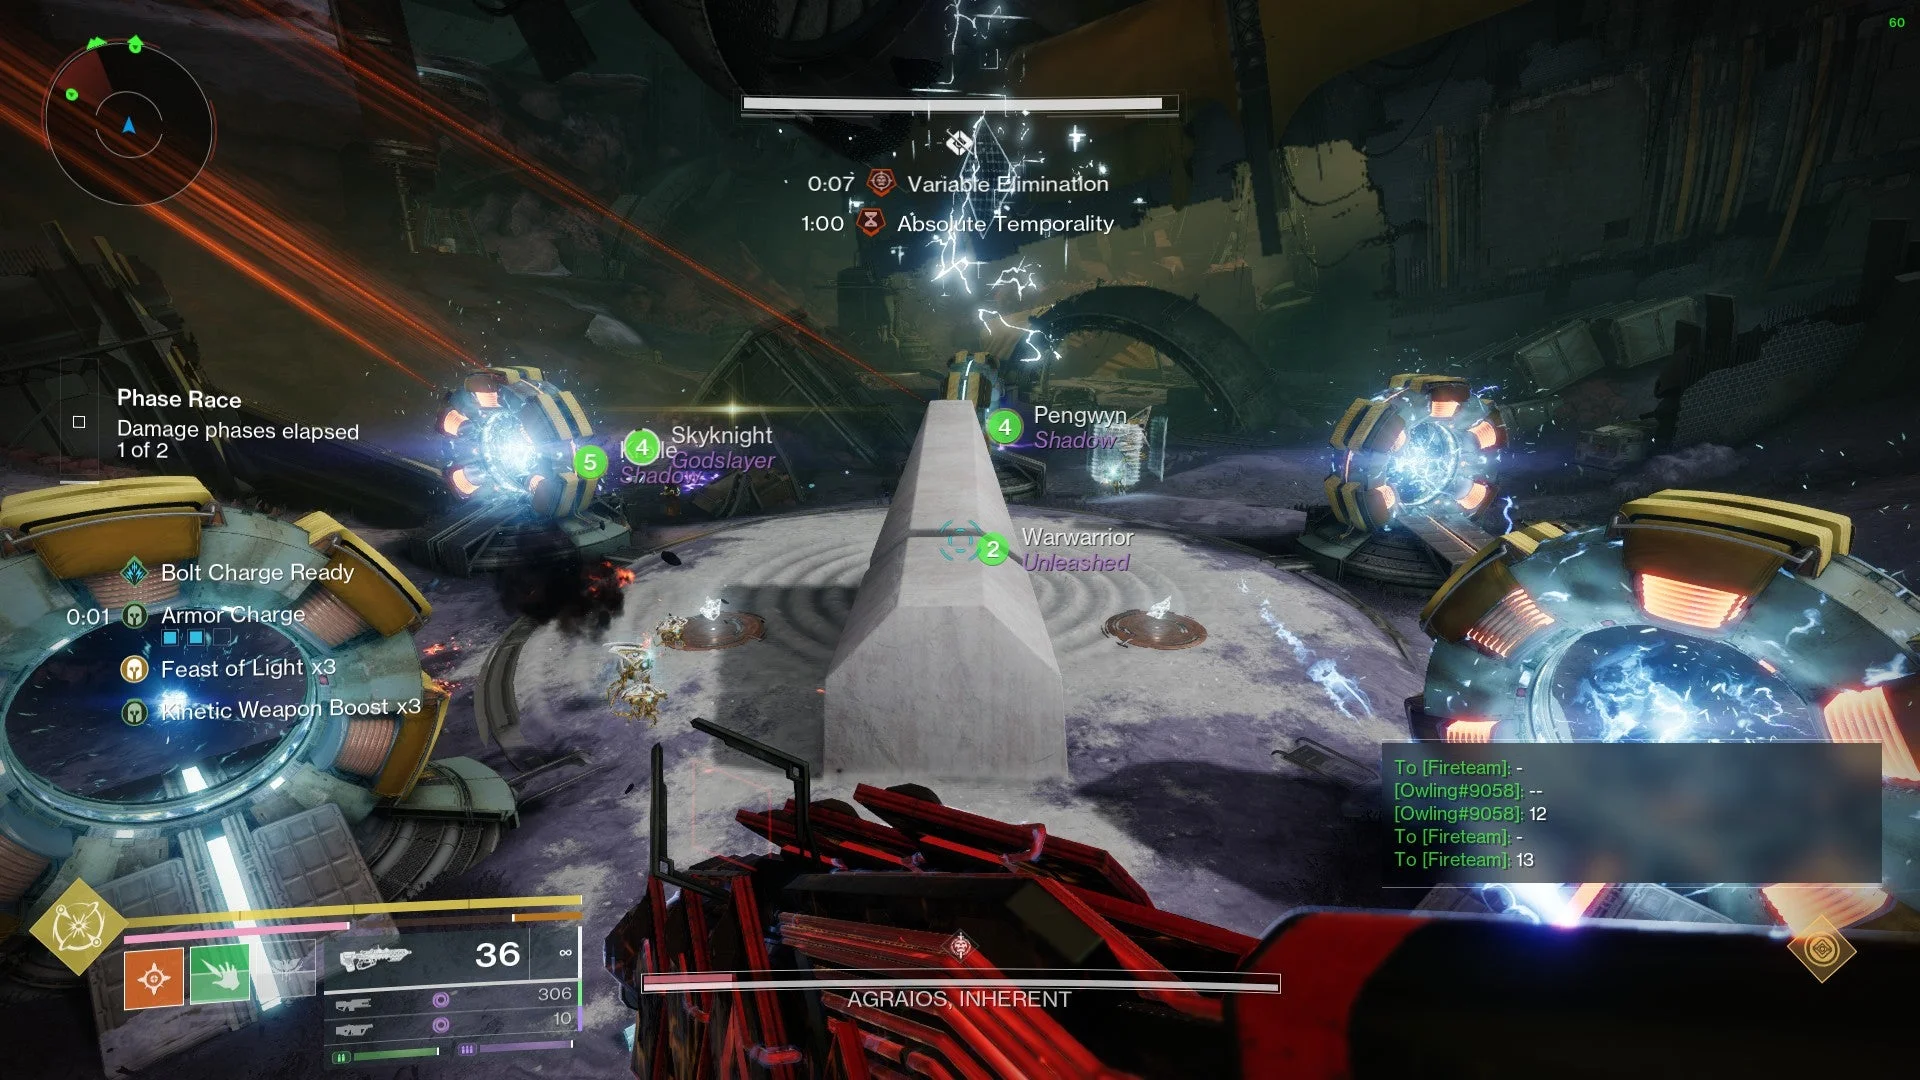
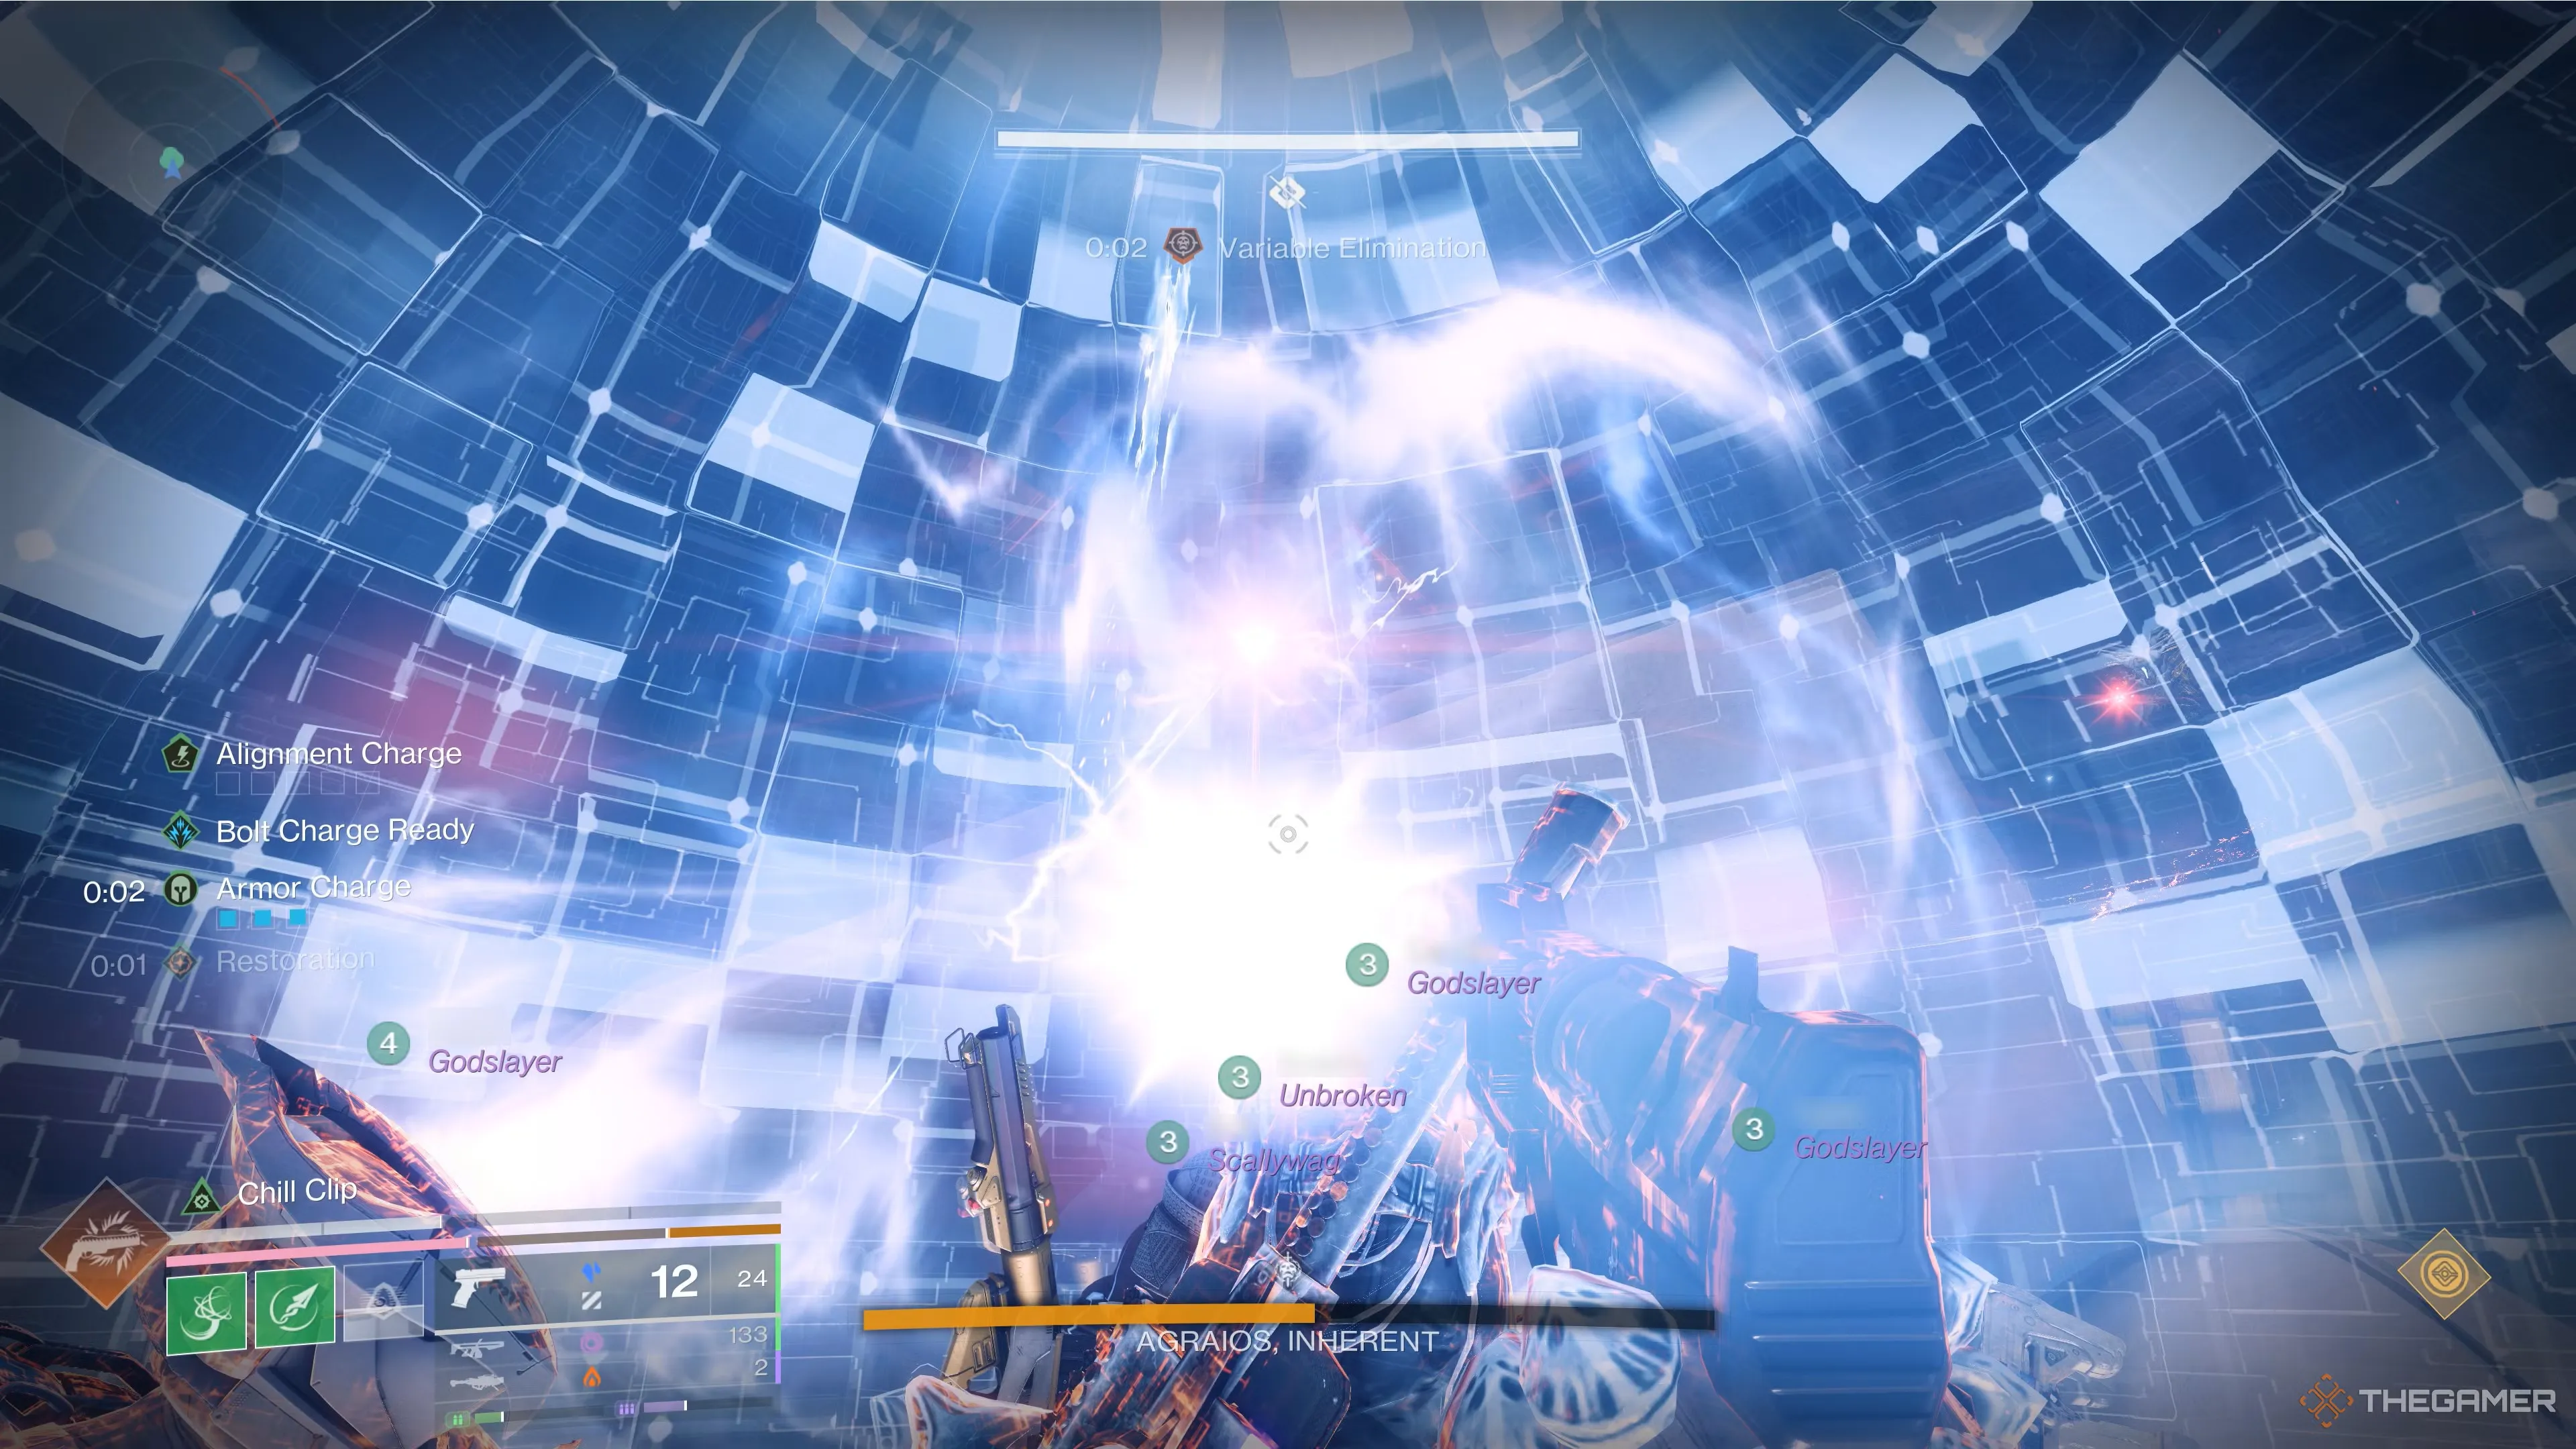
After all four portals have been charged with a Chronon, the aligned player must run through all five active portals and charge the Tachyon Alignment buff five times. This will change their grenade into a Vex detainment bubble. To begin DPS, the player with the detainment grenade must reflect one of the Agraios's Variable Elimination sniper shots. Everyone should fall to the center area. Get someone to count down to the Variable Elimination attack. Around the two-second mark, throw the detainment grenade down on the player and hide in the dome (see picture). The bullet should be reflected back to the boss who fired it, killing it in the process as well. The boss will show up in the middle after a few seconds, and DPS will start. You have about 15 seconds to do damage before the boss runs away and tries to use Variable Elimination again.
Once the boss teleports away, everyone in the team will get the Tachyon Alignment buff. One of the players will run through all 5 portals again to charge the buff 5 times again to get the detainment grenade. Block the Variable Elimination attack again with the detainment grenade to spawn the boss in the middle again for another DPS phase. Other players can still DPS the boss while it is standing on one of its elevated platforms. This happens up to three times during DPS. After that, the fight returns to normal. Repeat the whole process until the boss is defeated.
Challenge Mode:
Every player must pick up a Cronon before anyone can pick up another.
Points to Note:
- First wave spawns only 5 Minotaurs; the 6th player gets theirs after killing the Hydra to spawn more Minotaurs.
- During running/DPS phases, some players may hold a Cronon they can't deposit—this is acceptable if the group cycle remains correct.
- Plate roles may need rotation if someone is holding a leftover Cronon that must be banked before they can pick up another.
Epoptes, Lord of Quanta
Fallow Pavilion- Titans: Thundercrash + Cuirass of the Falling Star (More the merrier!). Bolt Charge.
- Warlock: Well of Radiance / Song of Flame + Sanguine Alchemy / Speaker's Sight for extra healing.
- Hunter: Golden Gun + Celestial Nighthawk.
- Outbreak Perfected / Thunderlord for DPS. Tractor Cannon for debuffing.
- Special / Heavy Grenade Launcher or other burst damage heavies for add clear / Harpies and Cyclops.
- 2 groups of 3 on each side of the map:
- 1 x Room (Inside) Reader.
- 1 x Ad Clear (Room + Main Arena).
- 1 x Main Arena (Outside) Reader.
Ad Clear and Main Arena Reader roles are interchangeable.
Epoptes is a "reading and shooting" boss. In this fight, one player calls will give a callout and the other person shoots it, multiple times. You should divide your squad into two groups of three because there are two sides to this encounter. You should also give each side a "inside" and "outside" reader.
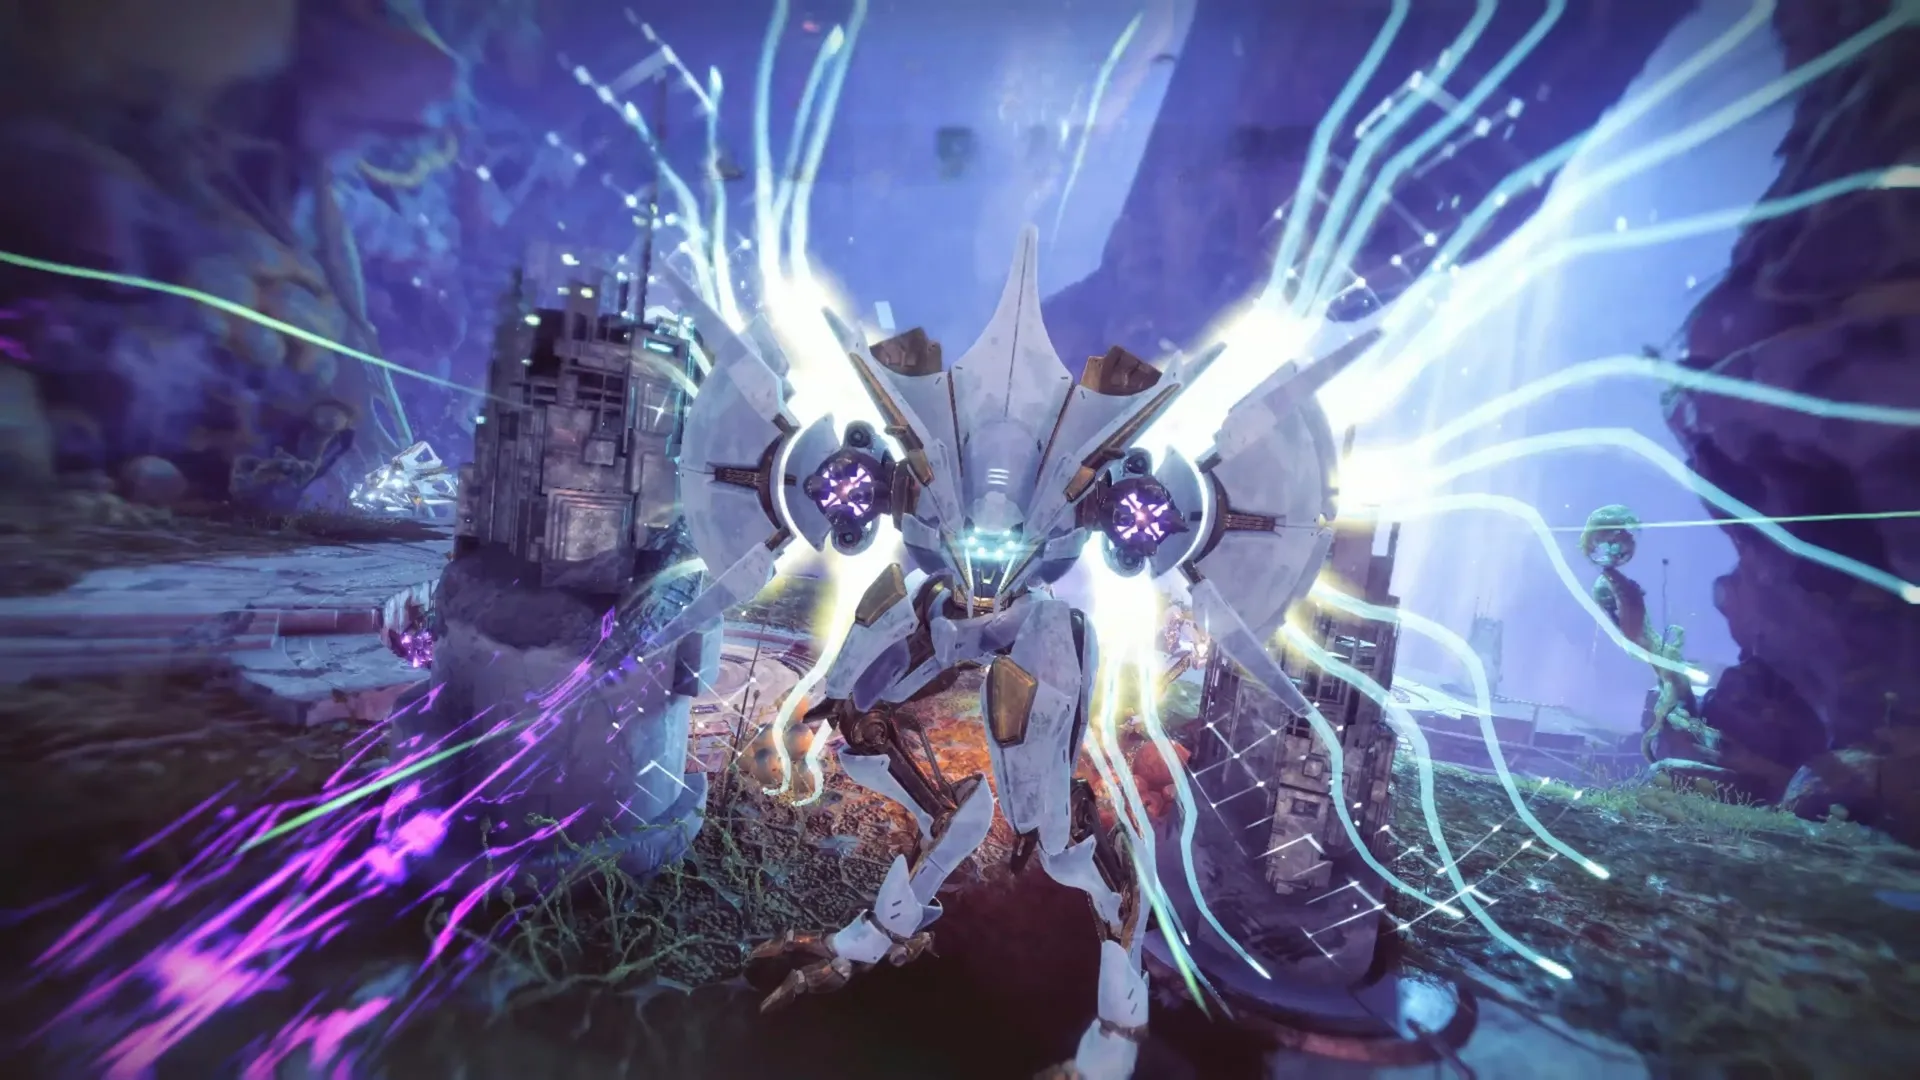
Enter the arena to spawn the initial wave of enemies and yellow-bar Cyclopses named Time's Magistrate. Destroy Time's Magistrates to spawn two Cyclical Temporality buffs on neighboring plates (see first image). The buff appears like a latticework collection of white lines. Two players must stand on the plates at the same time to pick up the buffs and access their respective side rooms. A second player will travel with them for add clear. The remaining two unbuffed players stay in the middle and the room to keep it relatively clean of adds. They'll also need to perform a single piece of reading not long into the pre-DPS part.
Room Duty
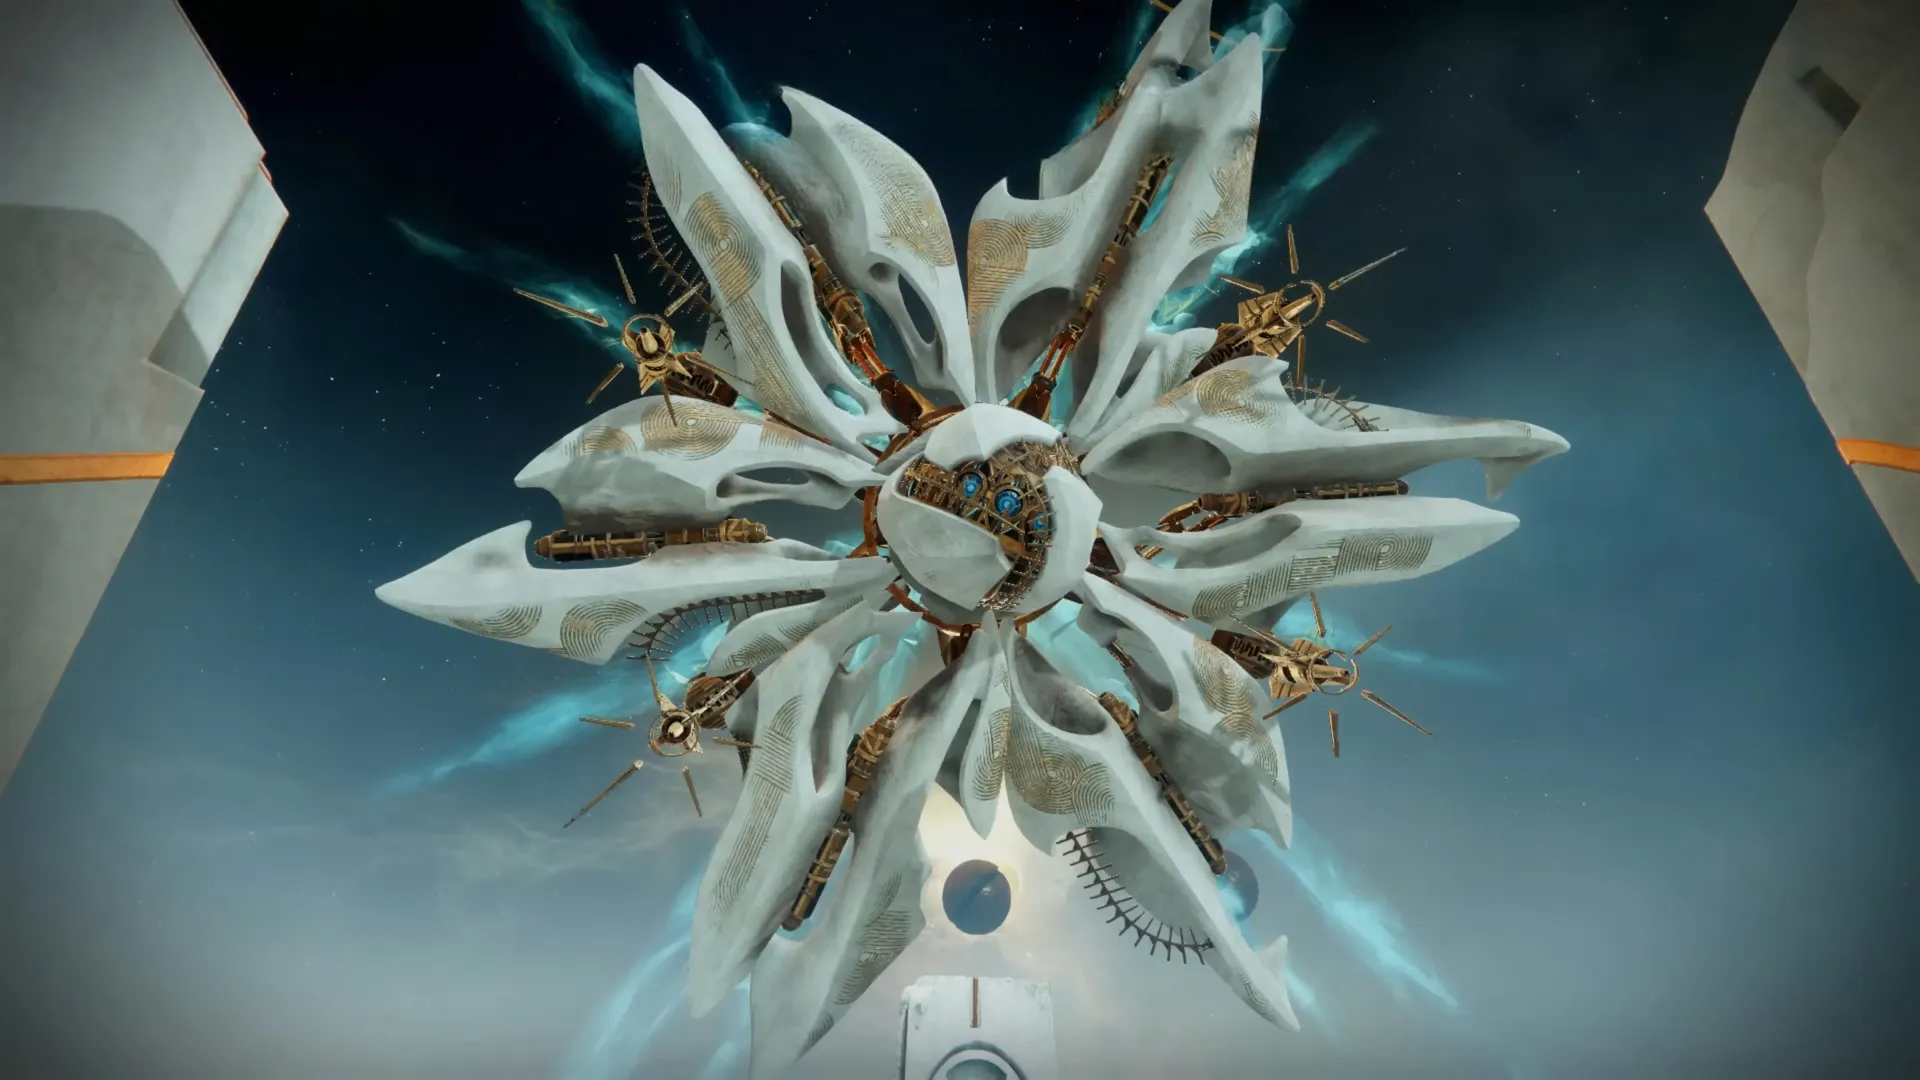
In the side rooms, there will be a boss Hydra with a shield covered in seven eyes: six on the exterior in a hexagon, and bigger in the middle. In each room, there is another hexagon made up of 6 eyes. One of these squares will light up in both side rooms when the buffed player enters the light beam (refer to second image). The debuff timer will be paused so long as they're in the light, preventing death. Both buffed players will yell out which tile is lighted up. They then fire the eye on the Hydra's shield called out by the player in the adjoining room.
- So for example, if Player A says "bottom middle," and Player B says "top middle," A would shoot top middle, while B would shoot bottom middle.
- Another method would be labelling the eyes with numbers (1-6) from left to right and calling out the numbers instead.
This happens four times. Note that the eyeballs need to be shot practically simultaneously and correctly without the player leaving the light beam for too long, else all the eyes will grow back and shut, forcing the players to start from scratch.
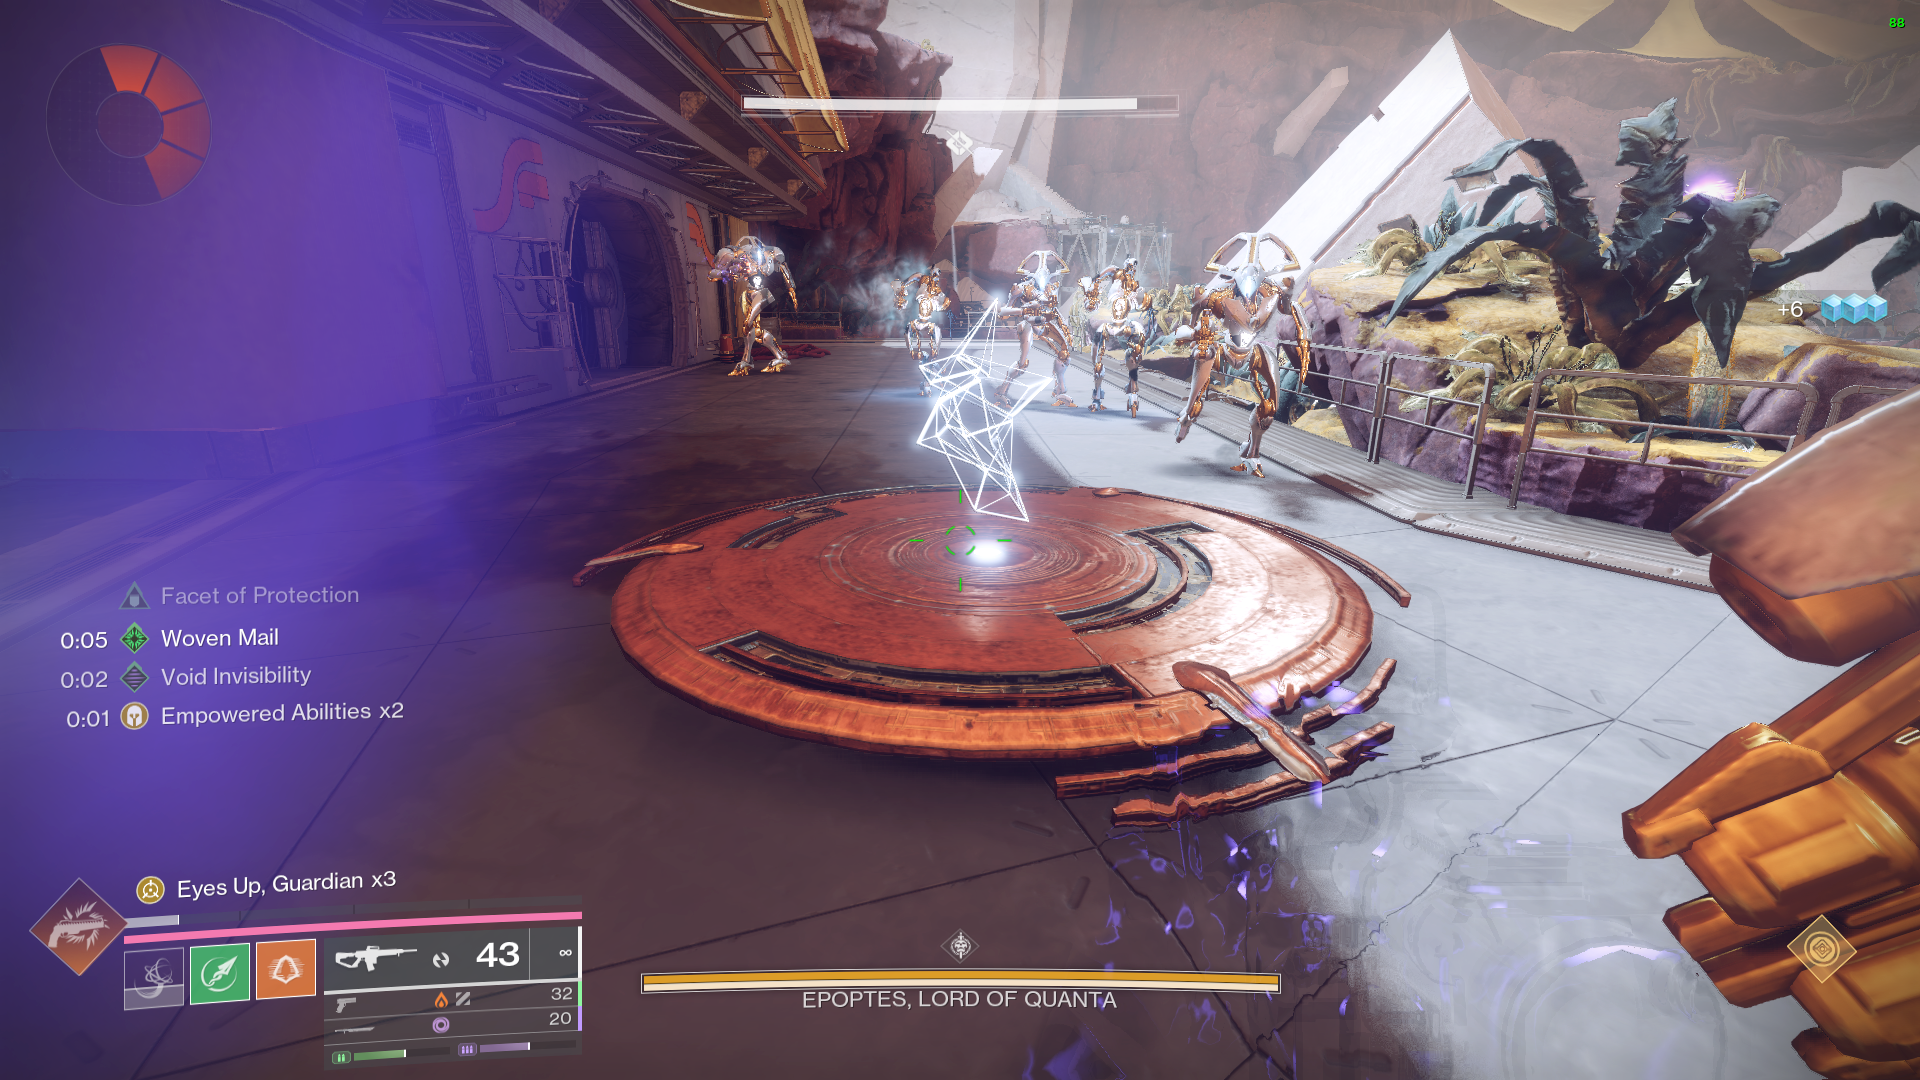 The plate where the temporality buff is obtained.
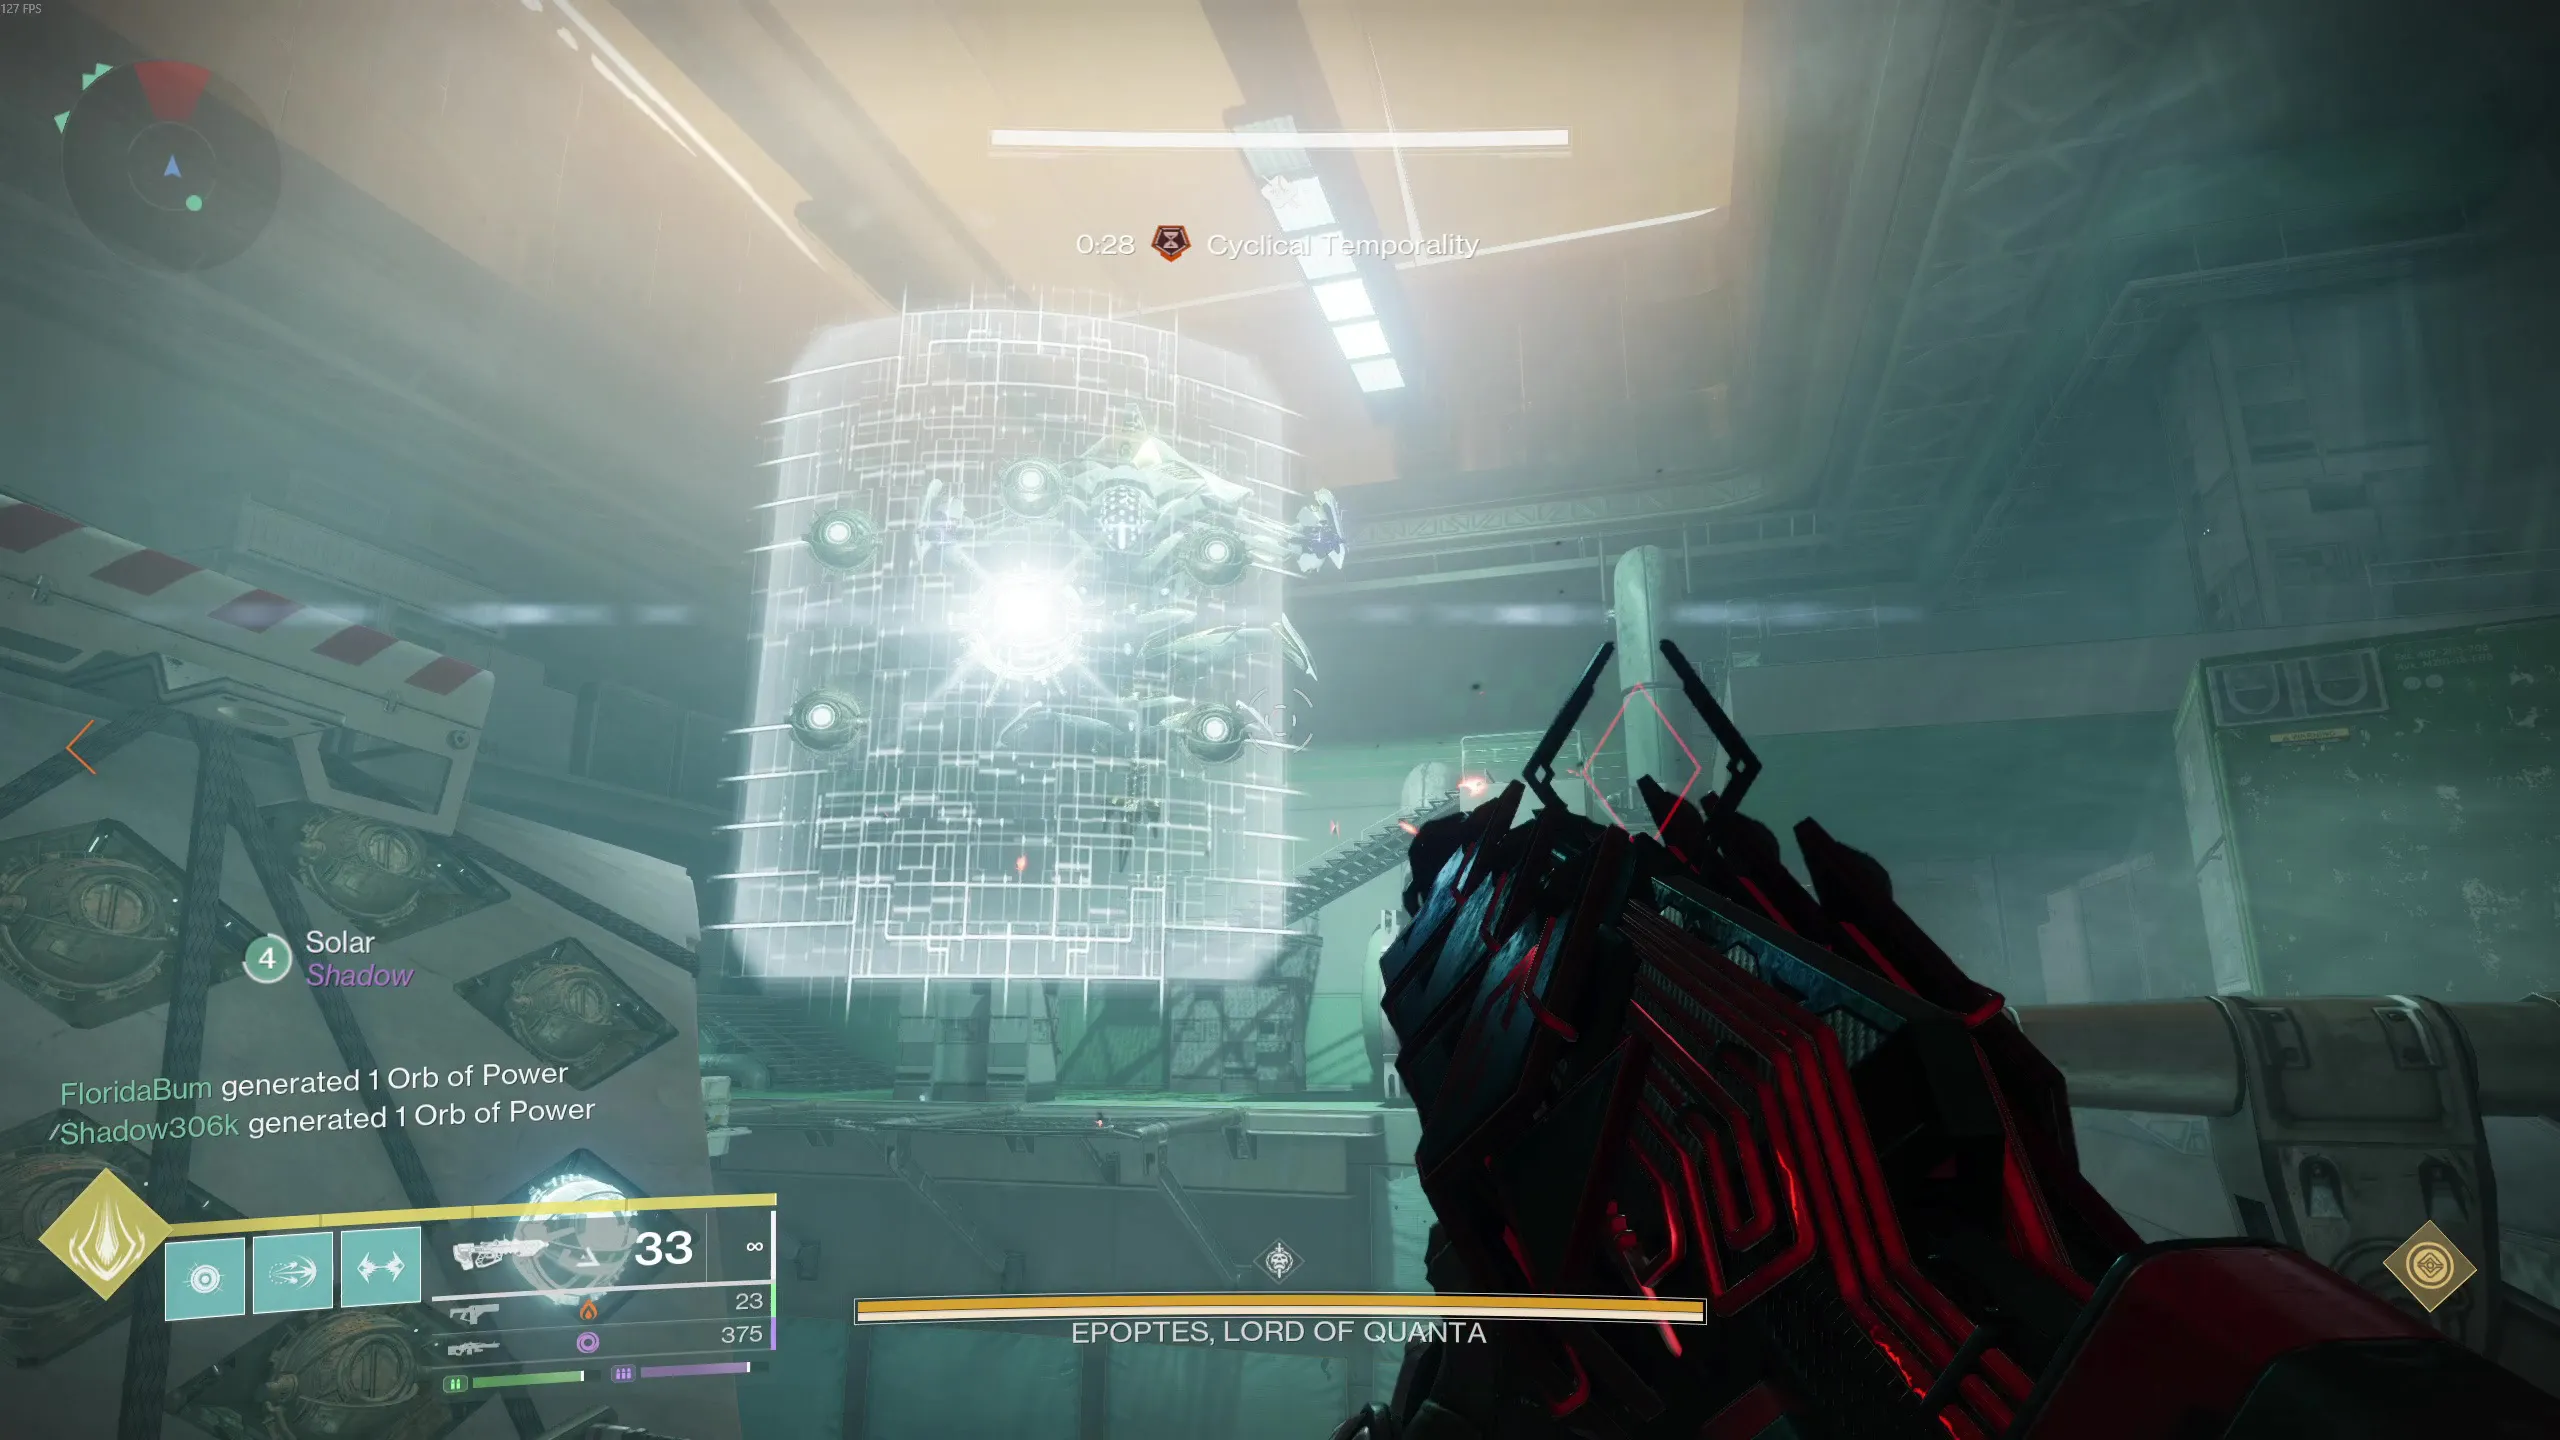 On the shield, the seven eyes are arranged in a hexagonal
pattern. On the left you can see the 6 eyes on a panel that is
supposed to be the callout for the opposite room.
On the shield, the seven eyes are arranged in a hexagonal
pattern. On the left you can see the 6 eyes on a panel that is
supposed to be the callout for the opposite room.
Outside Duty
After around 4 eyes are shot, a flavour text will appear saying, "Epoptes judges parameters exceeded and prompts function collapse." This means that players on outside will need to do their part. Those players must now get the Temporality buff from the plates. A Time's Magistrate may respawn, preventing the plate from working, eliminate them as soon as you can. If you are quick enough you can grab the buff before the Magistrates spawn in.
After both readers obtain their buffs, they need to stand in the beam of light emitted from Epoptes's shield. This pauses their Temporality timer and reveals two out of three diamonds on the center pillar (refer to first picture). The outside player should call out the diamond that isn't glowing. In the rooms, the player should be looking at the three spheres above the Hydra in the room (refer to second image) and shoot the one that was called out. Any callout system works, though “top, left, right” is usually the simplest. From the room, this will be from the POV of the player entering the room. To prevent confusion, you can callout your teammate's name as well to ensure the correct person shoots the correct sphere.
As the outside player, in addition to calling which diamond on your side isn't glowing, you must also listen to the opposite outside reader's call and shoot the two diamonds on their side that are glowing. You won't be able to see what is glowing on the other side of the central pillar, so listen and shoot carefully. Put simply: call your missing diamond, then destroy the other side's lit ones. Once both the inside and outside players have destroyed their respective diamonds/triangle sphere, everyone will be cleansed of Temporality, and the wipe mechanic will be stopped.
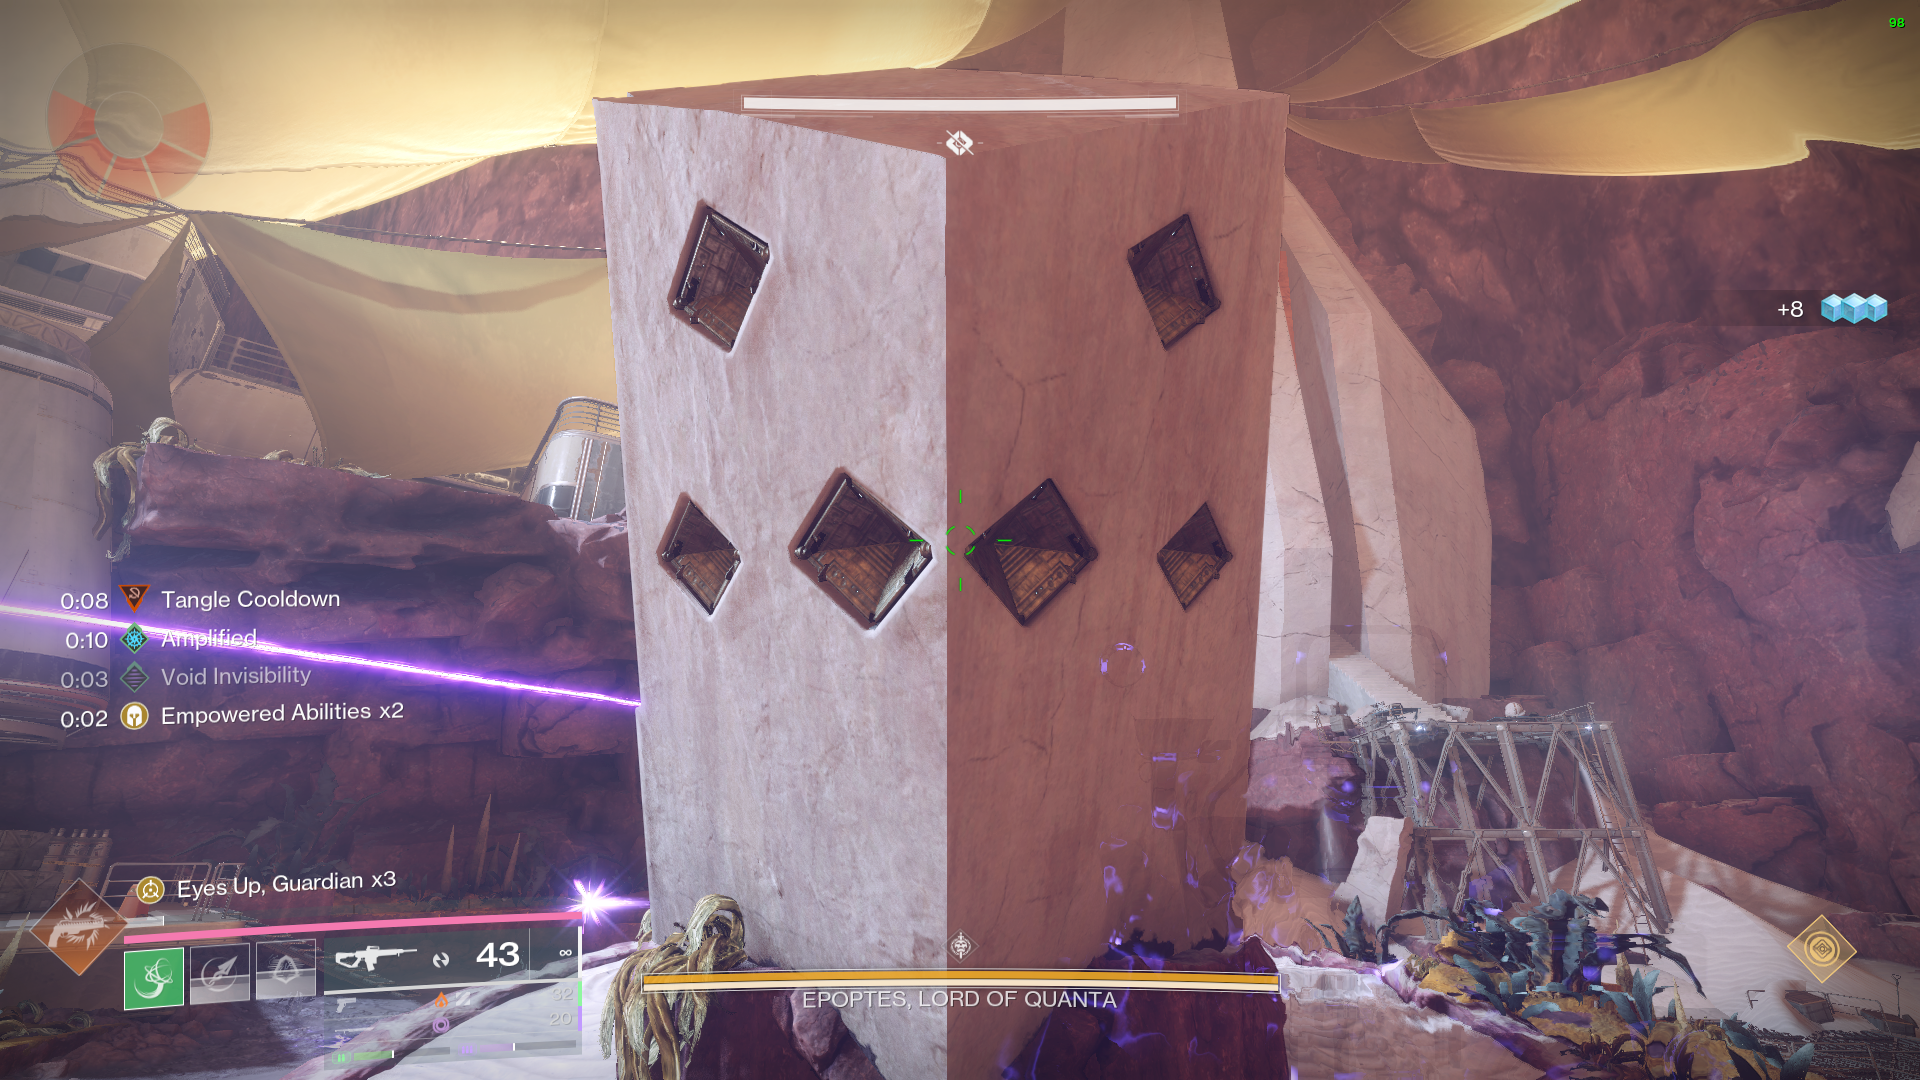 The central pillar where the two center players make their
callouts on each side.
The central pillar where the two center players make their
callouts on each side.
 The three orbs above the Hydra. The outside player will call
which one to shoot.
The three orbs above the Hydra. The outside player will call
which one to shoot.
When this sequence ends, the inside players must pick up their Temporality buffs again and return inside to complete the lens-breaking and diamond-reading process. Finishing this grants them the Probabilistic Lancet buff, which lets them shatter Epoptes's shield by destroying the central lens on his body in the main arena to trigger the DPS phase.
DPS Phase
Epoptes will 'pull players through time' three times during DPS. This mechanic is identical to what the inside players had to do, but without the reading and calling. Two players are chosen at random each time and will receive a random Temporality buff and the Probabilistic Lancet buff after you are 'pulled through time.' You will need to run to the half of the Hydra's shield, where you can destroy the spawning lenses by standing in the beam of light and destroying them. The lenses don't spawn immediately, so you have some time, but don't linger too long because you will lose a phase of damage if you don't destroy the lenses in time. After shooting the lenses, return to damagings the boss. Keep repeating this process until the boss goes immune.
To defeat Epoptes, you'll probably need to complete this whole rotation at least twice. Repeat the steps until you have defeated the boss.
Challenge Mode:
In each eye room, the two assigned players must alternate shooting the Hydra's eyes.
Points to Note:
- Alternation applies only to the six shield eyes inside the room.
- The wipe eye and anything outside the room are not part of the challenge requirement.
Iatros, Inward-Turned
The ChambersTBC.
Challenge Mode:
A different player must pick up each buff while climbing the platforms.
Points to Note:
- There are 3 buffs to collect. Assign 3 players to climb the platform.
- At each stage: one player grabs the buff, then leaves to help with Minotaurs or banking; the next player continues up for the following buff. Continue until DPS Phase begins.
Koregos, The Worldline
The NurseryTBC.
Challenge Mode:
Every player must dunk one of the six Chronons during the encounter.
Points to Note:
- Adopt a 2-2-2 formation: two players per role (Cyclical, Contact, Absolute). After completing a phase, everyone rotates to a different role. Clockwise or Anti-clockwise, it doesn't matter.
- Buff timers carry over even when your buff name changes after rotation.
- Constant-buffed players should stun the boss right before rotating, to avoid issues with timer expiration and the boss's laser attack. Other players should also reset their timer if possible before rotating.